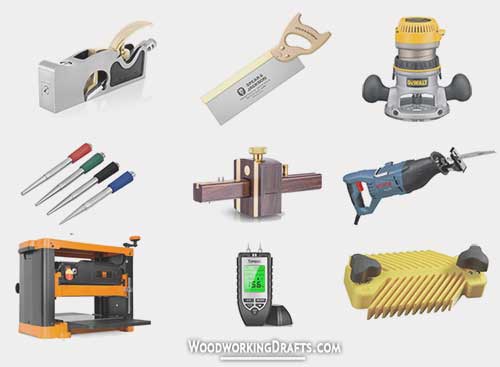
Your Complete Guide To The Best Woodworking Hand Tools, Power Tools And Shop Tools
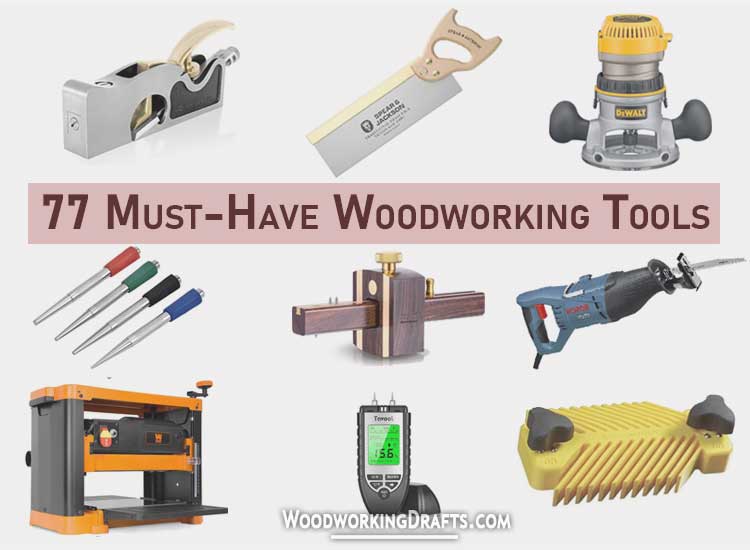
As you make the journey from an amateur to a master woodworker, you will build a collection of the best woodworking tools.
Your collection will include a host of hand tools, portable power tools, stationary shop tools, and a system for organizing all your equipment.
Let us look at all the essential woodwork tools needed for your shop, from the most basic ones to highly specialized precision gear.
Basic Woodworking Hand Tools
Claw Hammer
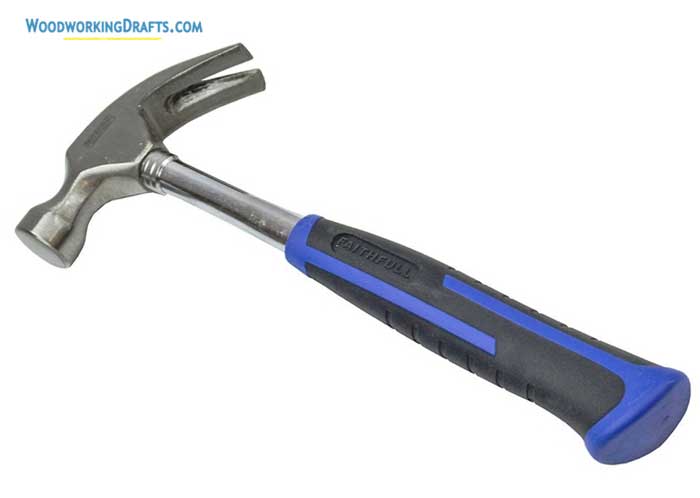
The claw hammer is obviously the most basic woodworking tool. The best hammers are forged from a single piece of solid steel.
The claw and the striking head should balance each other in weight. And the handle must have padding to make it easier on your hands when striking.
A rustic hammer with a wooden handle may look more beautiful. But a steel hammer with a rubber grip will be easy on your wrists when you have to quickly drive a lot of nails.
Wooden Joiners Mallet
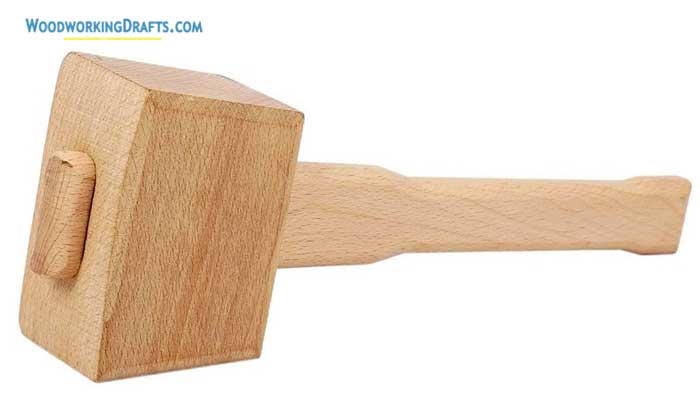
Mallets are mainly needed for striking chisels to cut grooves and mortises while crafting joints. If your strike a chisel’s base with a metal hammer, it will get damaged.
You can even build your own wooden mallet from hardwood lumber. Make sure both ends of the mallet feel balanced in your hands.
Nail Set
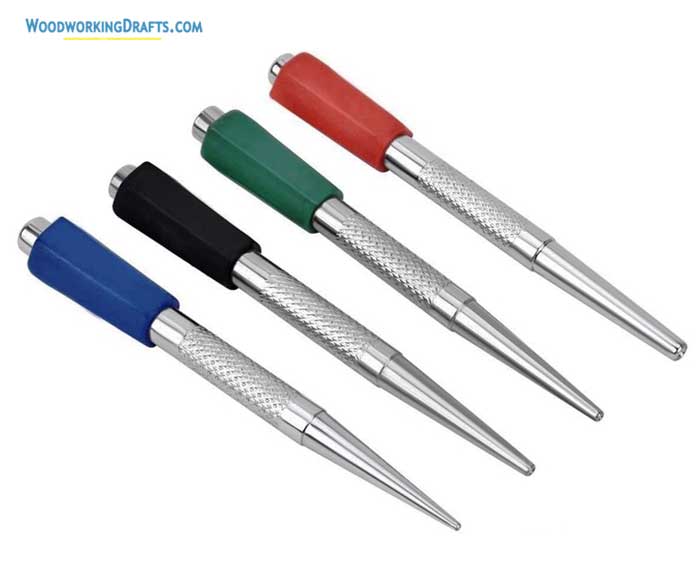
A range of nail sets in different sizes is an essential tool for any woodworker.
A nail set helps you drive the nail’s head deep into the wood and prevents it from sticking out. Then you can easily cover it up with paint or stain and hide the holes effectively.
Nail setters usually have a curved tip to help grip the nail head while driving it in and avoid slippage.
Woodworking Measuring & Marking Tools
Retractable Tape Measure
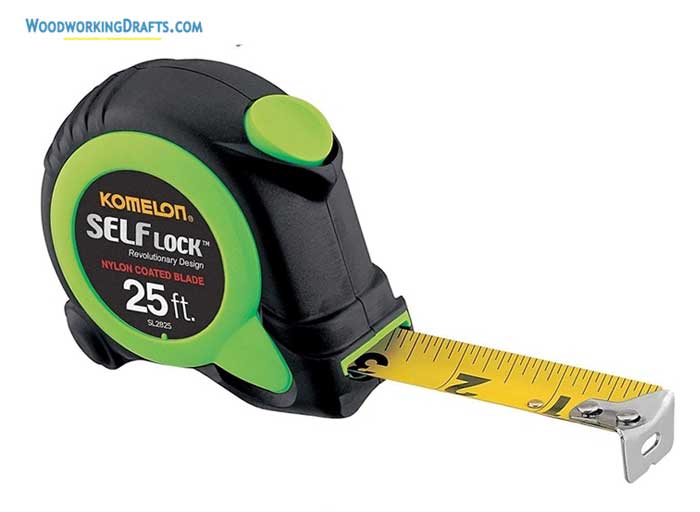
As the old adage says, “Measure twice, cut once .” An accurate tape measure is a vital tool for any woodworker or carpenter.
Get a retractable measuring tape that locks into place to hold the tape steady while taking measurements precisely.
Check that the hook at the end of the tape is tight and doesn’t move, as this could compromise your measurements.
Moisture Meter

A high-quality moisture meter will help you in every woodworking project.
The moisture content of lumber greatly changes the way it bends or cracks when you work with it. Even two ends of the same timber board could have different moisture content if it was dried incorrectly.
The pins of the moisture meter should be firmly in contact with the lumber when taking readings. A quality moisture meter will have different settings for different wood species.
Measure at multiple locations to get a more accurate idea of the wood’s water content.
Spirit Level
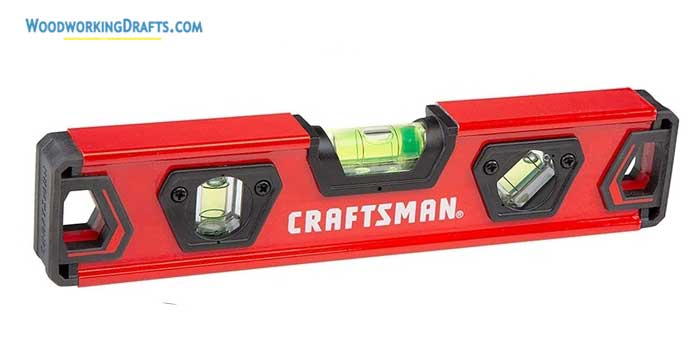
Every woodworker must have a few spirit levels. You should get an 8-inch torpedo level. If you are not doing outdoor construction work, then a two feet level is the maximum size you need.
Each level will have two bubbles, one to show the level or horizontal alignment and the other for the plumb or vertical alignment. Laser levels are also available, but these are not frequently used in woodworking.
Dividers / Compass
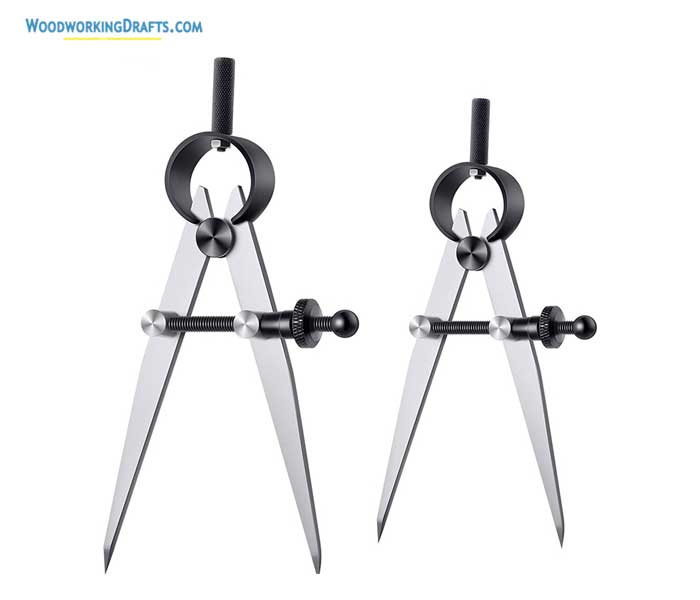
A pair of dividers or compass will help you take and recreate the same measurement again and again on different surfaces.
Traditional craftsmen don’t usually use a tape measure when building joints on furniture pieces. Instead, they use dividers to recreate the dimensions of each joint over and over again and eliminate any inaccuracies.
It is good to have a 6-inch divider as well as a smaller three-inch divider for making smaller measurements simultaneously.
Vernier Caliper
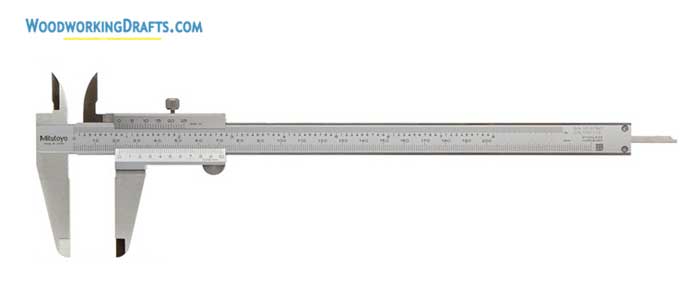
A vernier caliper is used to make extremely precise timber thickness measurements, like when building a mortise.
Readings are taken at different points on the board, keeping the jaws of the caliper as close to the board as possible. The smallest reading is usually the correct measurement.
Combination Square
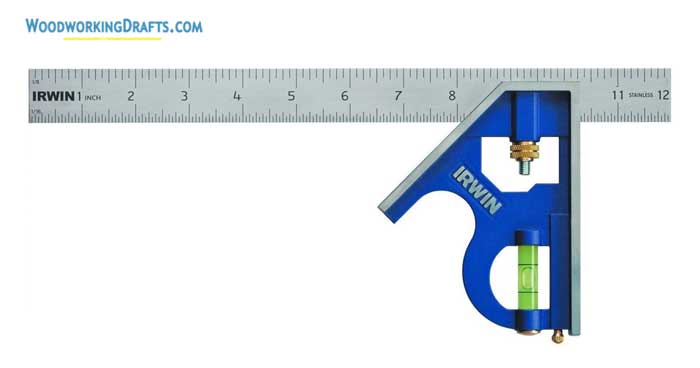
A combination square is used for quickly scribing lines on stock at 45-degree and 90-degree angles. It has a sliding ruler that can be adjusted to draw a parallel line along the lumber board, as you are cutting the timber.
The versatile combination square can also be used as a depth gauge and will also let you calculate the center of a circular piece. It is a critical tool in any woodworker’s portable toolkit.
Marking Gauge

Marking gauges help to transfer measurements from one piece of timber to another over and over again. It can be locked in place to prevent the gauge from accidentally slipping and changing the measurement.
If you do not have a mortise gauge, you must have a marking gauge to measure mortises effectively. It is a very essential tool when it comes to building furniture.
Mortise Gauge
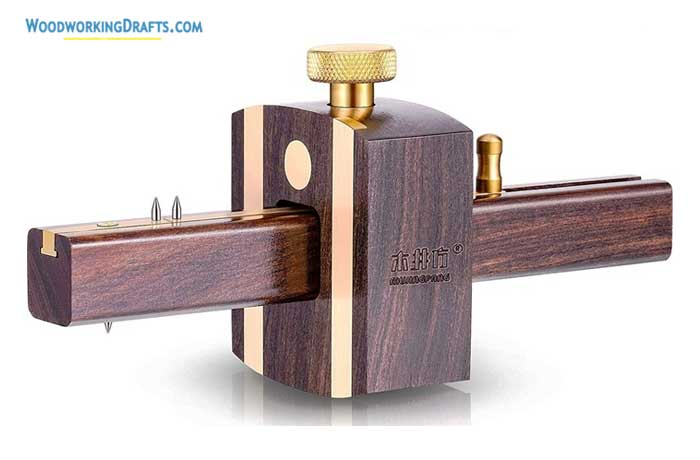
A mortise gauge may look similar to a marking gauge, but it has two pins. One pin is fixed, and the other is movable so that you can mark both the edges of a mortise at the same time.
Mortise gauges are usually made of hardwoods, and high-quality ones have brass fittings. The space between the pins can be changed by a sliding bar and locked into position with a screw.
Sliding Bevel / T-bevel

A sliding bevel or a T-bevel is very useful when you have to take a lot of angle measurements.
You can lock the tool at any specific angle, which will help you mark several angles on multiple timber boards quickly.
Layout Square Or Speed Square
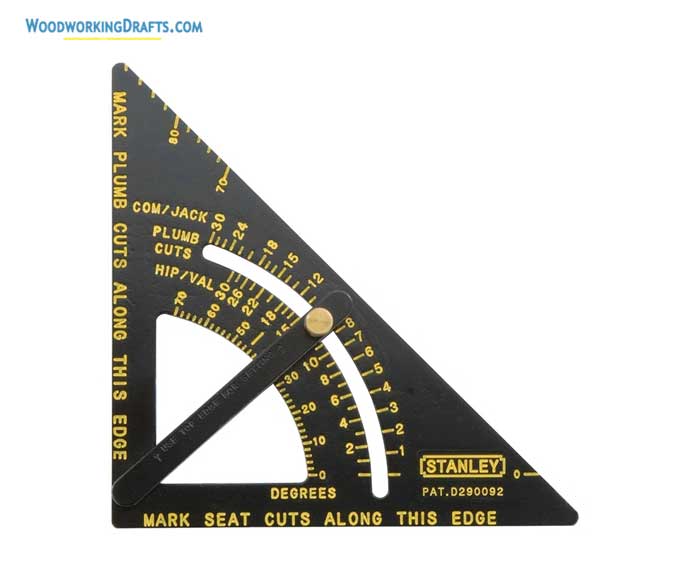
Most woodworkers use a six-inch layout square to precisely scribe square cuts on timber. It is also used to measure and mark angles on stock while marking a cut or measuring bevels.
This versatile measuring tool can be used as a try square, saw guide, miter gauge, and as a framing square.
Hand-Held Woodworking Planer Tools
Planes help reduce timber thickness, smooth and flatten its surface, and create a uniform finish.
There are different types of planes for different woodworking uses. Bench planes and block planes are the most commonly used ones. Specialized planes like plow planes and router planes are also used as per requirement.
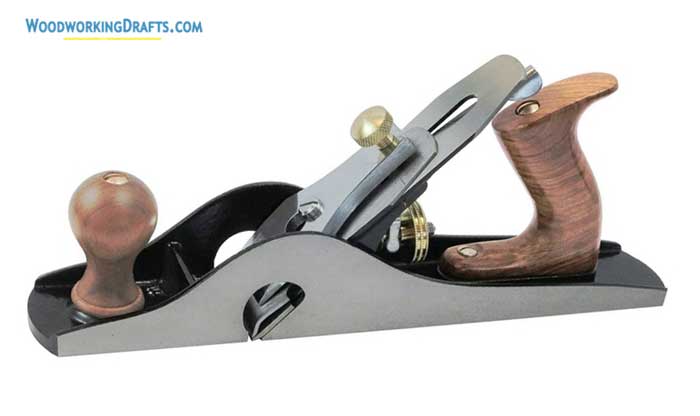
Jack Plane / Hand Plane
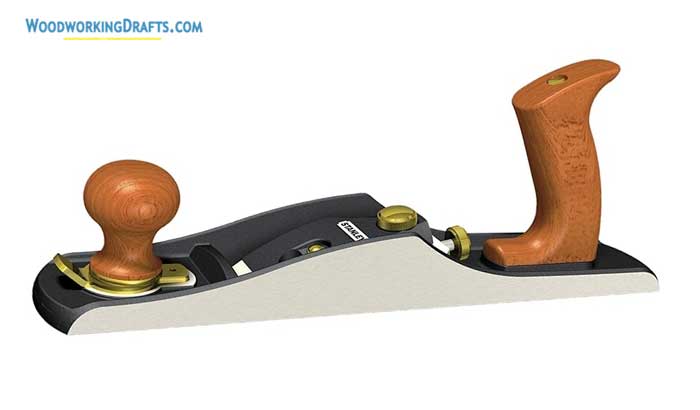
A jack plane is a medium-sized hand plane that acts as a jack of all trades. It is a special type of bench plane designed to be portable and lightweight.
If you are on a budget and can’t buy several planes for their specialized functions, then a jack plane will serve your needs well. A low angled Jack plane is perfect for beginner woodworkers.
It will help you join board edges, remove rough stock, and smoothen surfaces effectively.
Bench Plane
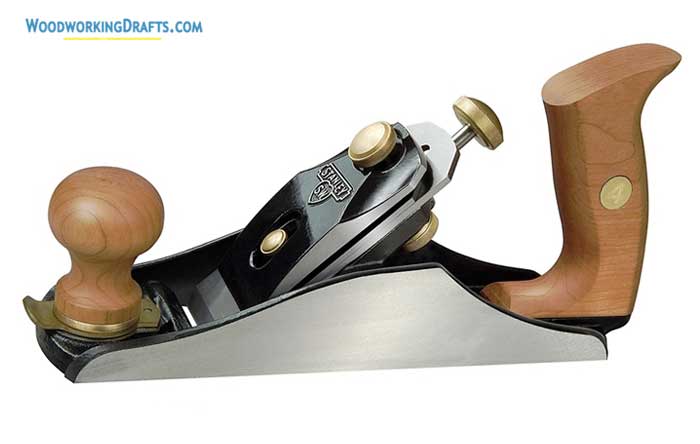
A bench plane usually has an adjustable mouth and a blade fixed at a 45-degree angle with a downward-facing bevel.
It has a bigger body and greater depth of iron than other planes. This decreases the odds of the blade getting jammed and also allows to make smoother cuts with lesser effort.
Because of their size, they are rarely carried around and are primarily used on the workbench, which gives them their name.
Block Plane

Block planes are small and designed to be operated with one hand. The blade inside is set with its bevel facing upward.
These planes are usually used for trimming end grains, creating chamfers, setting miters, and cutting dovetails.
Rabbet / Rebate Plane
A rebate or rabbet plane is used to cut, clean, and adjust rabbets on timber boards.
It is an essential tool every woodworker must have, as it is frequently used to create joints when crafting furniture pieces.
Shoulder Plane

A shoulder plane is taller than other planes, and its soles are at right angles to its sides. This makes it useful for squarely trimming the joint shoulders on tenons.
It is also used for trimming a shoulder joint’s end grain.
The blade inside the shoulder plane is usually set at a low angle, with the bevel facing upwards. They come in a wide range of sizes suitable for creating shoulders of specific sizes.
Hand-Held Woodworking Cutting Tools
Rip Handsaw
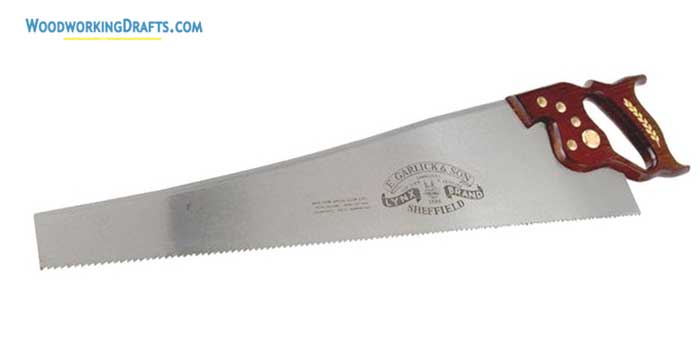
Rip saws have large teeth that are bent away from the blade but not angled.
These saws work like chisels to scrape away wood instead of slicing it.
They are used for cutting along the wood grain.
Crosscut Handsaw
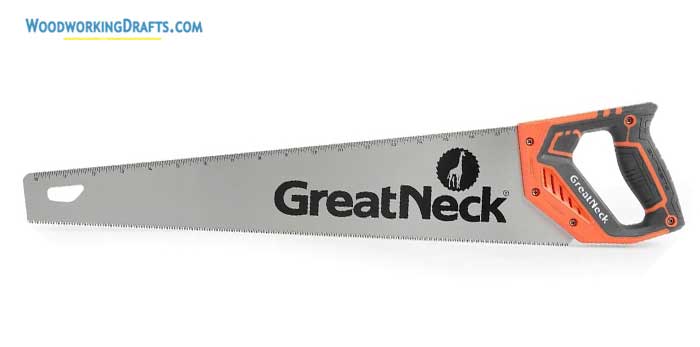
Crosscut saws have smaller teeth compared to rip saws, and they are set at an angle. This helps to cut wood perpendicular to the grain. This saw acts like a knife and slices through the wood to create a clean cut.
Today modern saws are available which have both rip and crosscut teeth, thus eliminating the need for two saws. However, such saws may be a little more expensive.
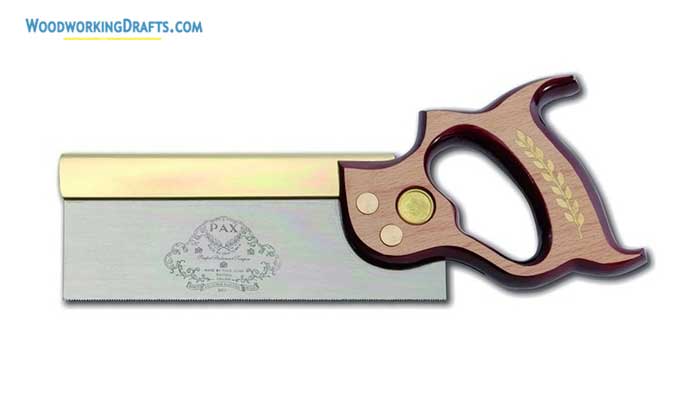
Back Saw
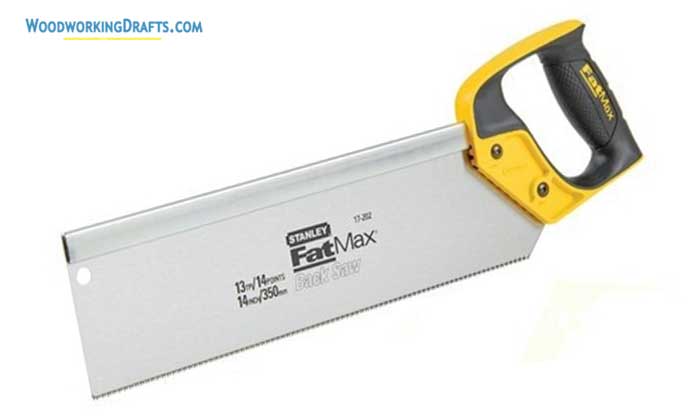
A back saw is a hand saw which has a stiffening rib that prevents the blade from bending while cutting.
This enables more precision and control while cutting tenons, miters, dovetails and other grooves needed in fine woodworking.
A back saw’s teeth are usually set very close to each other. They are available in various sizes based on cutting usage.
Miter Box And Miter Saw
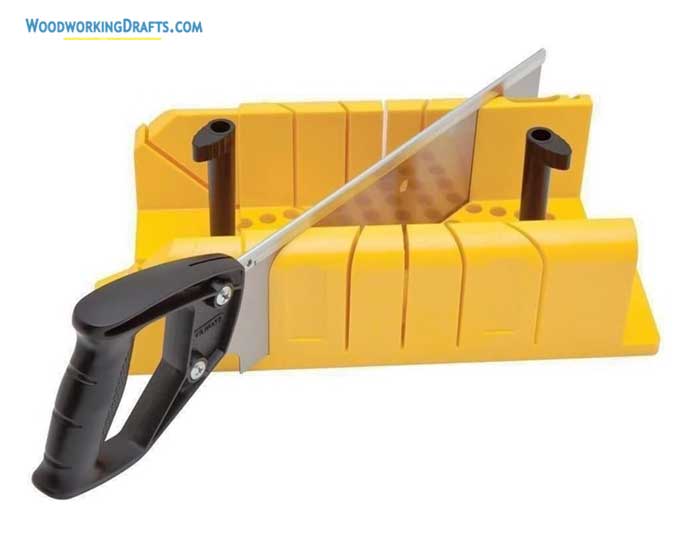
A miter box and miter saw are used to cut wood to exact lengths at precise angles.
The miter saw smoothly slides back and forth within the sturdy frame.
You can adjust the angle of the cut as needed to create any kind of miter joint for your project.
Coping Saw
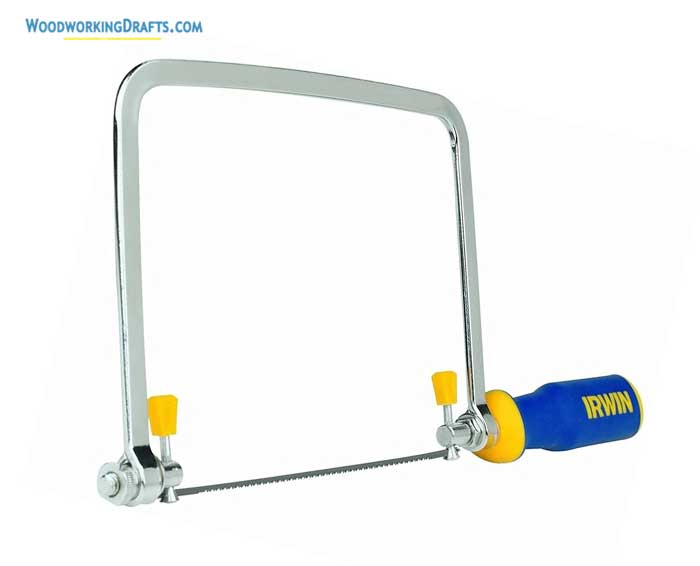
A coping saw is used to cut complex shapes and cut-outs into timber pieces.
The coping saw has an extremely thin metal blade connected to a U-shaped frame. So it can be easily turned as you are making the cut.
It is a kind of bow saw that can be used to craft moldings, cut curved shapes, remove waste from dovetail joints and make coped joints.
Japanese Saw
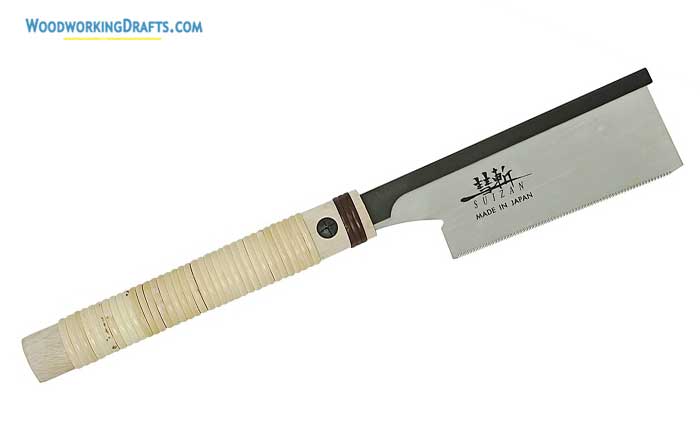
Japanese saws are designed to cut wood while pulling instead of pushing. The pulling action keeps the blade steady and prevents bending.
This saw has very tiny and surgically sharp teeth. And as the Japanese saw cuts on the pull stroke, it allows the blade to be up to 75 percent thinner than western saws.
Hence, cutting with Japanese saws creates much thinner kerfs and requires lesser muscle power. You can cut longer without getting tired.
Dovetail Saw
A dovetail saw is a small-sized back saw that is used for cutting dovetails while crafting joints. It has a fine rip tooth pattern that creates a narrow kerf.
Tenon Saw
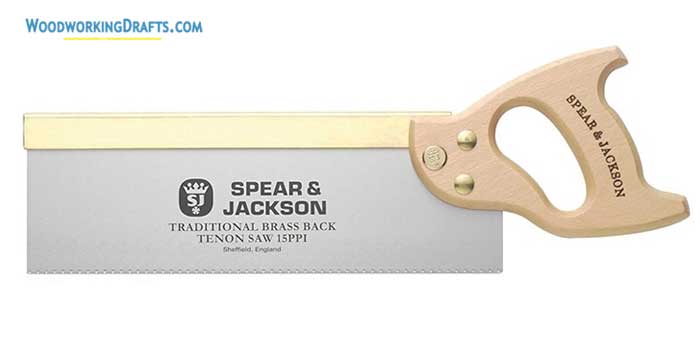
A tenon saw is a medium-sized back saw that is used for cutting the tenons in mortise and tenon joints.
Chisels
Chisels are one of the most commonly and frequently used cutting tools in woodworking. They are made up of a steel blade with a sharpened tip mounted into a handle.
Chisels can be used to cut large quantities of wood or make fine adjustments. They can cut in any direction relative to the wood grain.
Based on their specific use, chisels come in a wide range of sizes and shapes. Let us look at the most popular chisel types used by woodworkers.
Bevel-Edged Chisels
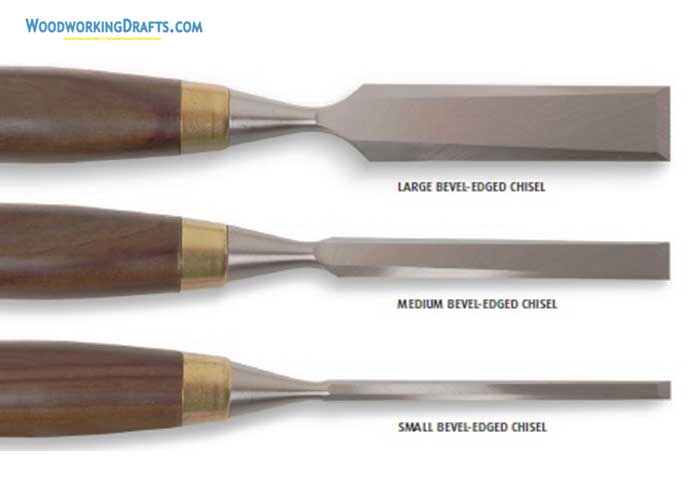
A chisel with bevels running down on both sides of the blade is known as a bevel-edged chisel. Its sides are narrow, and the chisel tapers toward the cutting edge.
This makes it easy to reach into narrow joints and corners with this chisel. Bevel-Edged chisels come in different sizes based on cutting needs.
Most of these chisels are designed with handles that are strong enough to be struck with mallets to speed up cutting.
These are the most frequently used chisels for most woodworking projects.
Paring Chisels
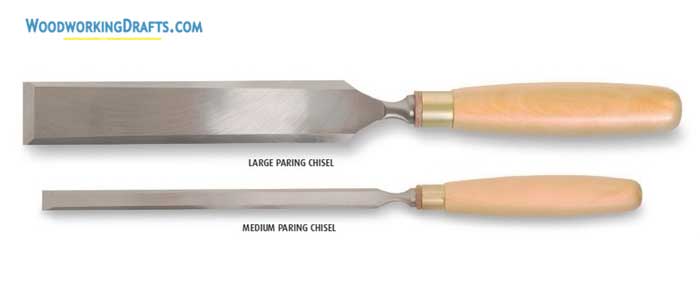
A paring chisel has a longer, thinner, and narrower blade compared to a bevel-edged chisel. It is used to shave away tiny amounts of wood like when smoothing or cleaning out a joint.
The extra length of the blade allows it to reach deeper inside from the edge of the workpiece, and the thin blade makes it easy to move around.
Due to their thin blade, these chisels cannot be struck with mallets.
Mortise Chisels
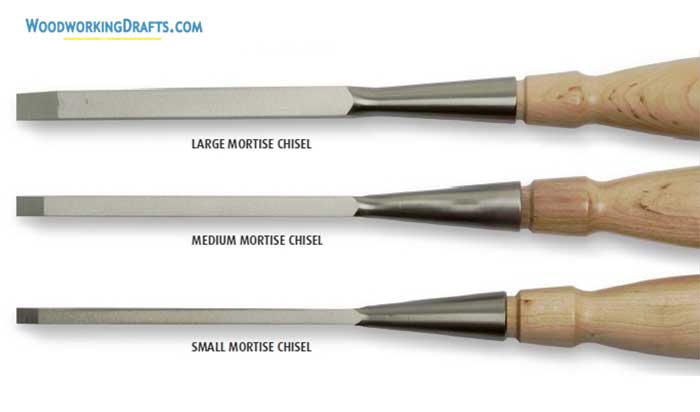
A mortise chisel has a large blade section and a very sturdy handle. As the name implies, it is used to craft mortises.
They are designed with strong wooden handles that can be struck with mallets. Some mortise chisels have a metal cap on the handle to prevent the wood from splitting when being struck.
Skewed Chisels
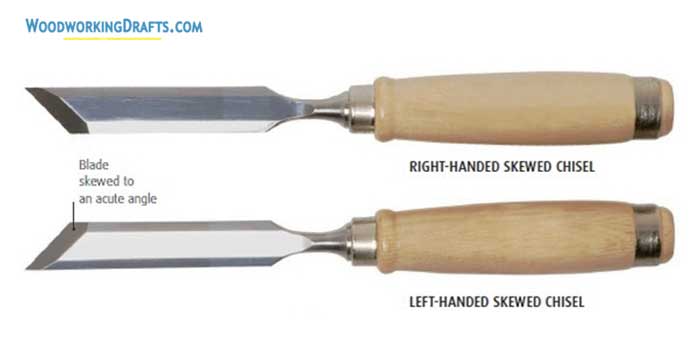
A skewed chisel is a variation of the bevel-edged chisel designed with the cutting edge at an angle to the blade.
They are used to trim and clean particularly tricky joints like the lapped dovetail. Their pointed end makes it easy to navigate around complex joints and tightly fit into corners.
Woodwork Clamping Tools
C-clamps
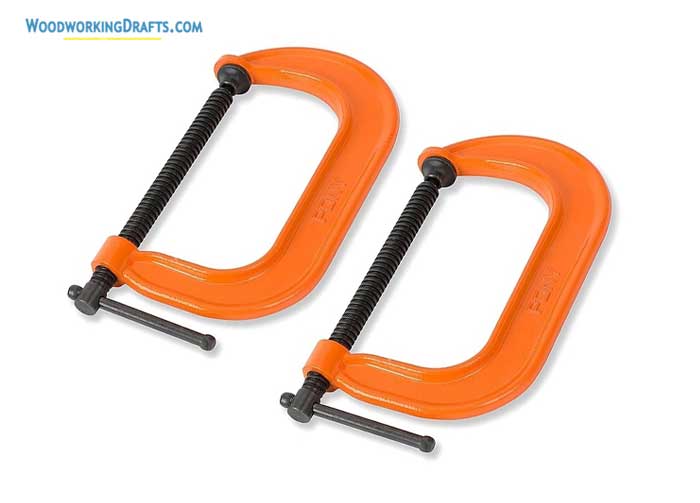
C-clamps or G-clamps are mainly used to hold the wood in place while a piece is being worked on or to hold joints tight while the glue is drying.
They are one of the strongest clamps available and come in a wide range of sizes.
F-clamps Or Bar Clamps
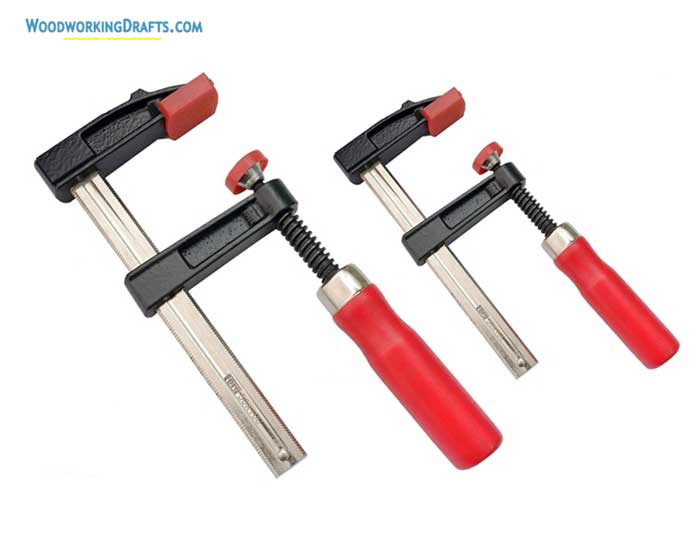
F-clamps can be adjusted much faster compared to c-clamps and reach much deeper into the workpiece.
They are available in a range of lengths to meet different clamping distances.
These clamps exert a smaller load compared to c-clamps and so are more suitable for gentler clamping needs.
Hand Clamps
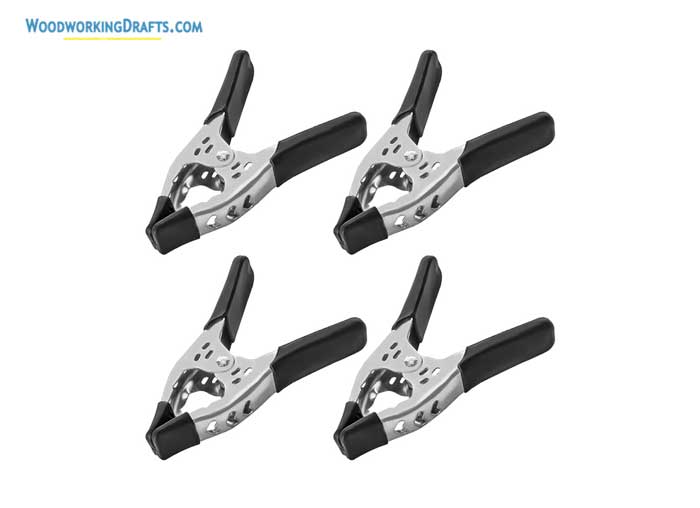
Hand clamps are small spring-loaded clamps that are used for holding small joints in place during assembly. They can be operated with just one hand.
You can apply any number of hand clamps on a project to cover all the important spots as needed.
Supplementary Woodwork Tools
Utility Knife
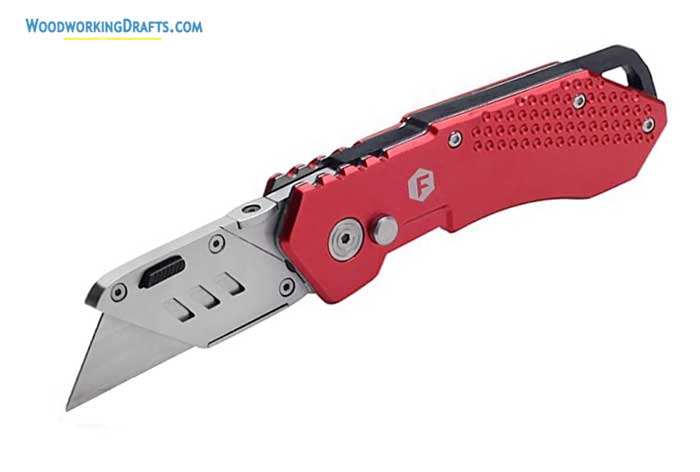
A utility knife is a handy tool that every woodworker must have.
It is best to get one with disposable blades. You can use the knife to clean out joints, scribe wood, and even score metal surfaces.
Screwdrivers
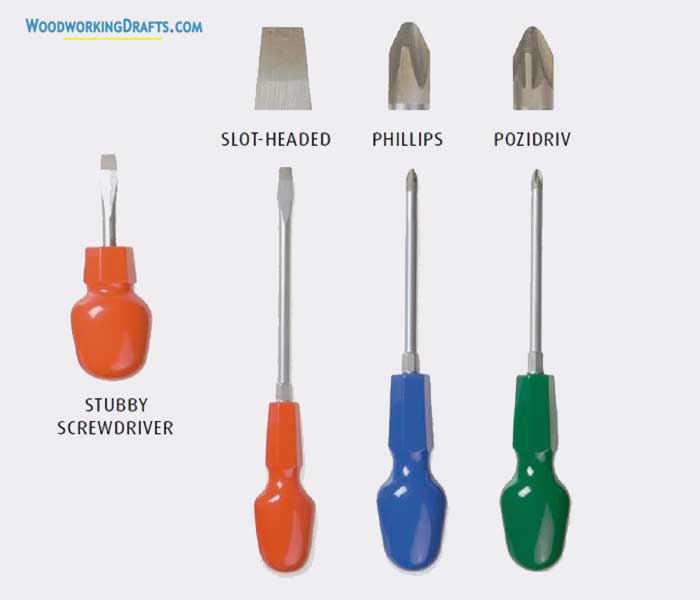
Every woodworker must have a collection of screwdrivers in different sizes with different heads.
Get some slot or flathead screwdrivers in small and medium sizes.
Also, buy a few medium-sized cross-head or Phillips screwdrivers with thin shanks for working on tight areas and building cabinets.
Having a stubby screwdriver will help you drive small screws into awkward tight spaces.
If you need to drive a lot of screws in a limited amount of time, it is best to get an electric screwdriver.
Miter Gauge
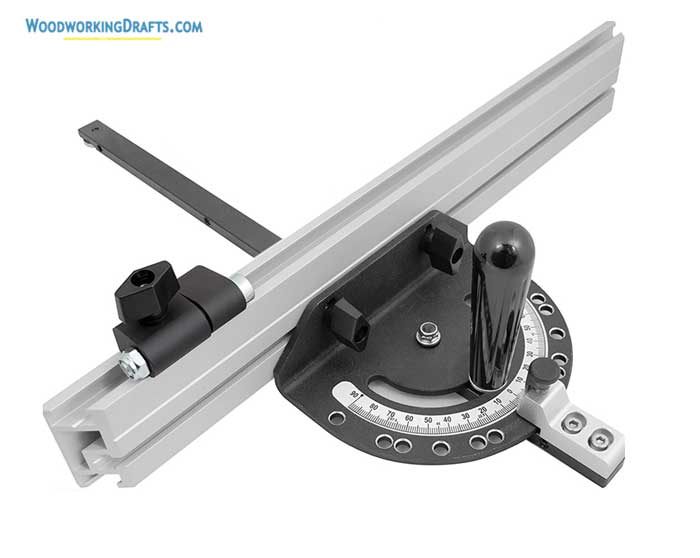
A miter gauge is a tool that holds a workpiece at a fixed angle while it is being cut on any stationary saw as the table saw.
The miter gauge glides into a groove on the worktable and moves along the table as the cut is being made.
Rip Fence
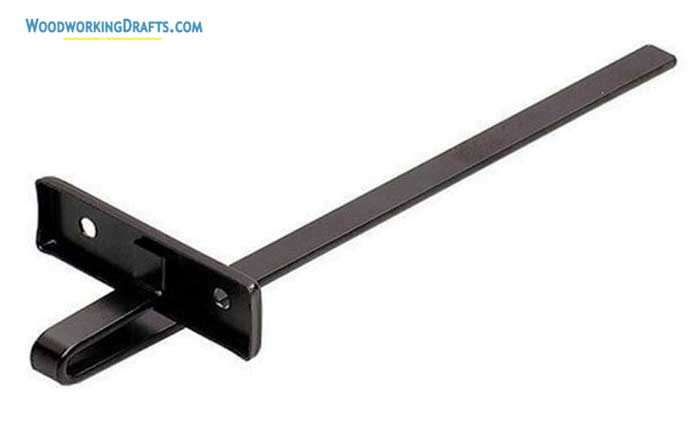
A rip fence is a cutting guide that usually stretches along the entire cutting length of the worktable.
It is typically set on the right side of the blade and can be adjusted along with the vertical and horizontal directions.
Rip fences are designed to lock into place firmly, so they don’t move as the saw makes the cut.
Feather Board
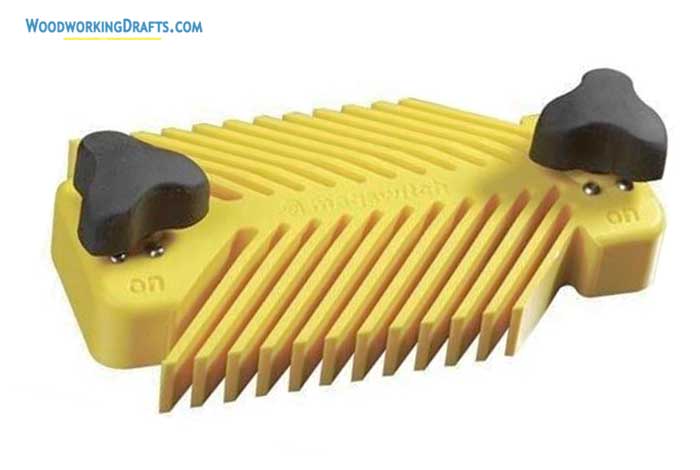
A feather board is a device that firmly holds in place any piece of timber that is being cut by a tool.
It also allows applying even pressure on the stock much closer to the cutting blade than it is safe for you to put your hand at. This helps to get an accurate cut and prevents dangerous kickbacks.
It acts as a third hand to hold long materials in place as you are cutting them, and it keeps your fingers safe when you are working with smaller stock.
You can build your own feather board or buy one. The readymade ones are usually much more user-friendly.
Sawhorse
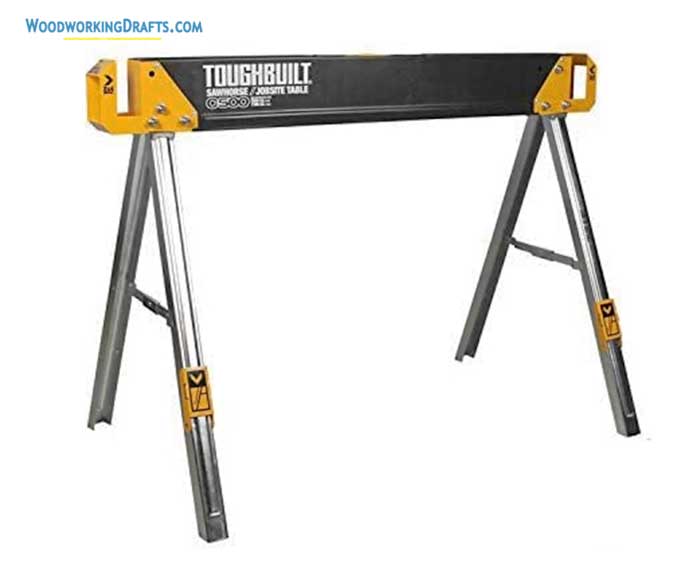
A sawhorse is basically a beam with four legs that is used to support planks and boards while sawing.
If you don’t yet want to invest in a quality workbench or are working away from your shop, then mounting a board on two sawhorses will create a temporary workbench for immediate use.
Sawhorses are also useful if you have to work on a particularly long piece of timber or have to work in a cramped space to make a difficult cut.
Metal Detector
Most non-engineered woods can possibly contain nails or other metal pieces hidden inside them.
Hardwood and softwood lumber cut from trees often contain stray nails or screws. These were driven into the trees at some point during their growth and got absorbed into the trunk as the tree grew.
Hence if you don’t want to seriously mess up your power tool blades, then you should scan every piece of solid lumber with a metal detector before you start working on it.
Tool Storage System
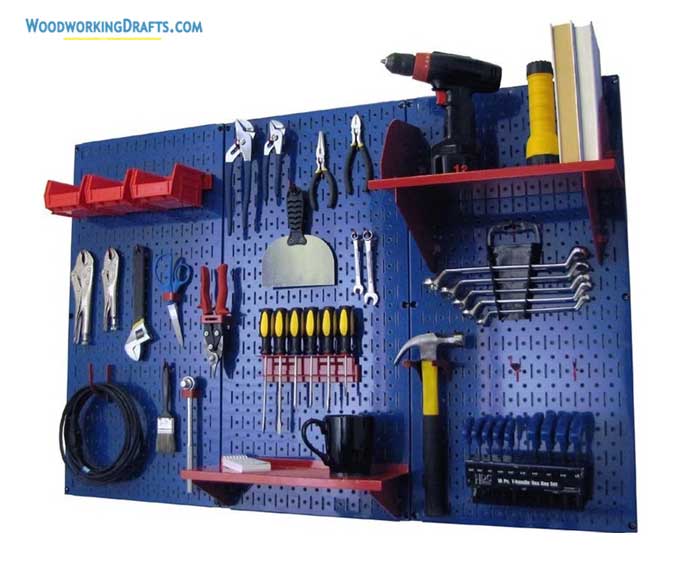
Your personal choice for storing your tools may depend on the space available to you and the number of tools you own. However, it is never a good idea to leave all your tools piled up in one corner in some box.
It is best to have a system to organize your tools so that each one is readily available on need. Otherwise, you will have to go searching any time you want to use a tool.
Arranging all your tools neatly on pegboards, shelves, and clearly marked bins will save you a lot of time in the shop.
Dust Collector
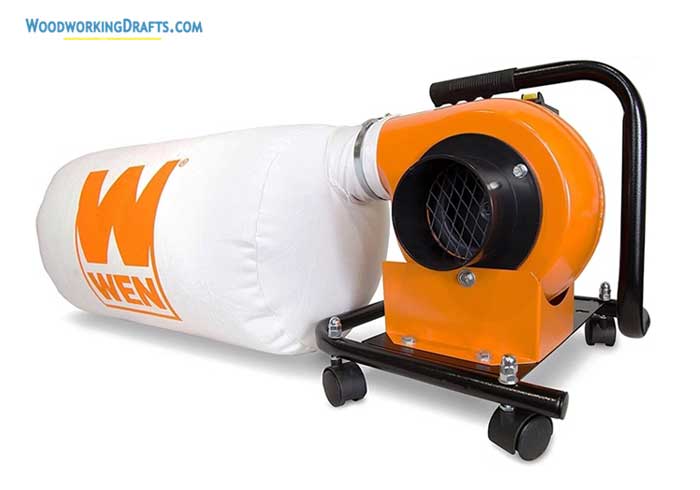
As you start working on more projects of bigger size, having a dust collector will become essential.
The dirt, sawdust, gases, and debris created while cutting or sanding stock will keep polluting the air and floor of your shop and make it very messy over time.
Having a dust collector will ensure your shop remains clean.


Sharpening Woodworking Tools
Bench Grinder
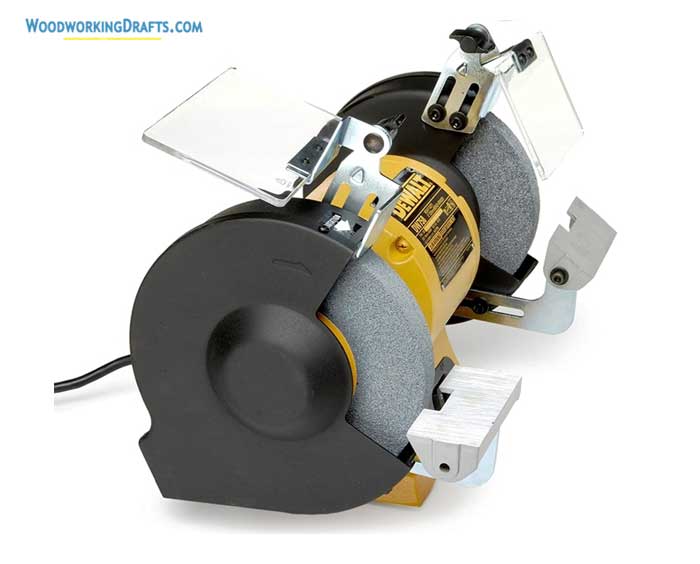
A bench grinder is essential for sharpening your chisels as they get dull with use.
The time and money you will save by keeping your tools sharp will easily offset the cost of getting a decent bench grinder.
Sharpening Stones
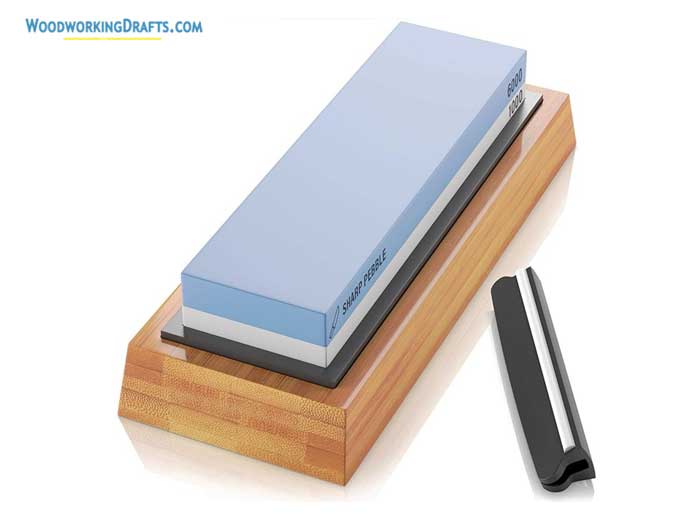
If you are on a real tight budget and can’t get a bench grinder right now, then sharpening stones are the next best thing.
They will take quite some manual labor to sharpen, and you will have to lubricate them before each use. Oilstones are lubricated with oil and water stones or whetstones with water.
Use a sharpening stone with a coarser grit to hone initially and restore the edge, then use a finer grit to do the final sharpening.
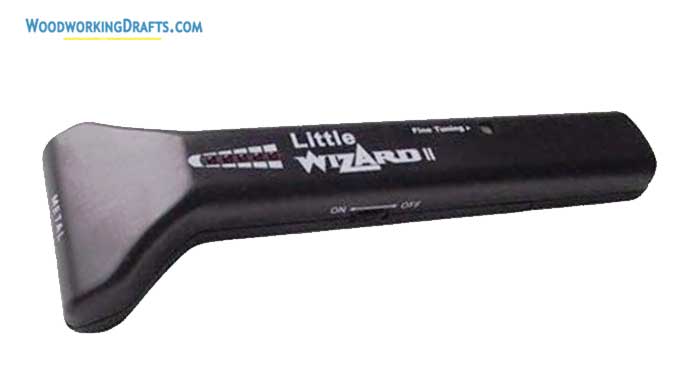
Honing Guide
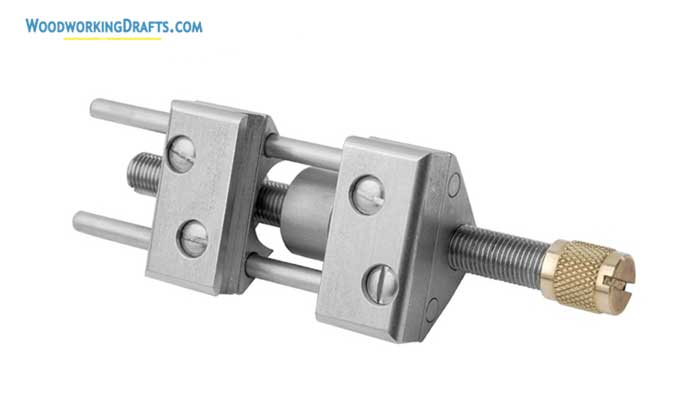
A honing guide is used to hold the blade of a tool at a precise angle while it is being sharpened.
This helps preserve the beveled edge of the blade and reduces the need for regrinding. In the long run, this increases the tool’s lifespan.
Woodworking Power Tools
Power Drill
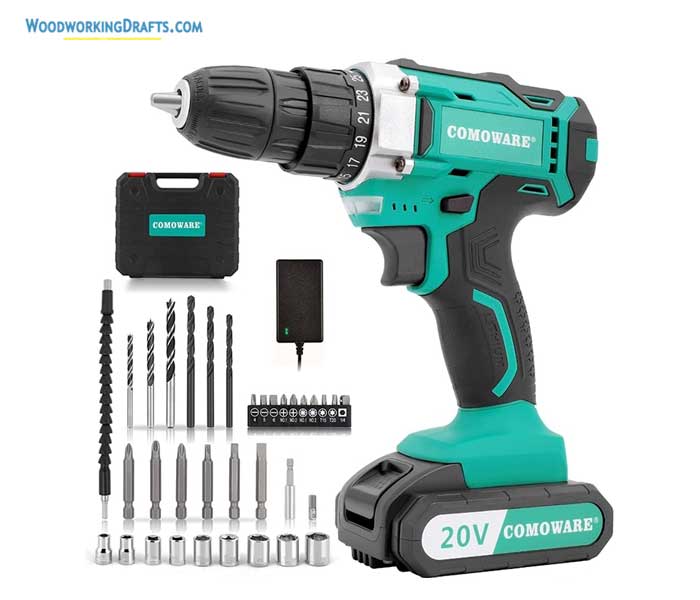
A power drill or electric drill is a vital tool for any woodworker at any experience level.
If you want to save some money, you can get a corded one, but most pros prefer to use cordless power drills.
One advantage of the corded drill is that you can keep using it for a long time, even with heavy drill bits, without stopping to recharge.
Drill Bits
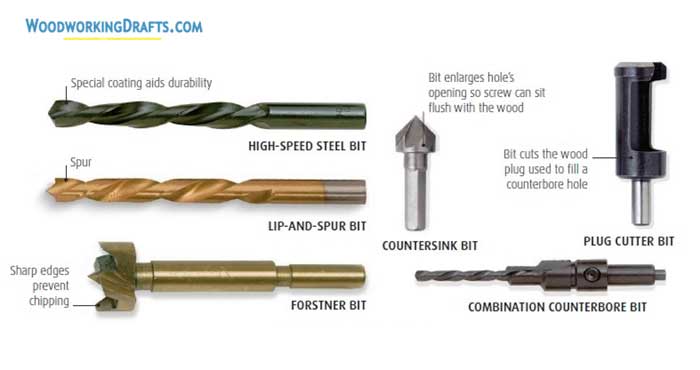
While power drills do come with a basic set of drill bits, you may need other kinds of bits for specific situations.
High-speed bits are useful for cutting into a wide range of materials of varying densities, from wood to steel.
Lip and spur bits to help in accurately drilling pilot holes.
Forstner bits are needed for drilling flat-bottom, clean-sided, large-bore holes.
Counterboring bit helps to cut all holes needed for counterboring in one go.
Router
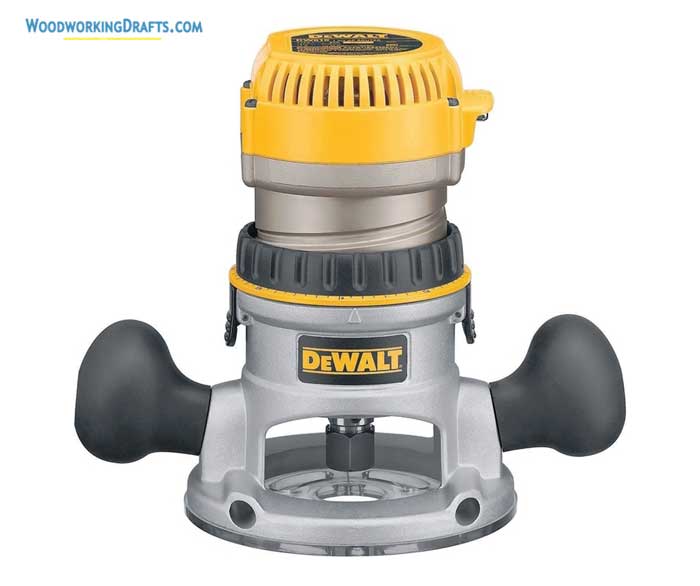
A router is a very versatile power tool that every woodworker must have. A router is used to quickly cut, trim, and shape wood into an unlimited number of shapes and patterns as needed.
If you are a beginner, a stationary base router will do just about everything you need. Get a router with a minimum of 2 horsepower.
Variable speed routers are better than fixed speed ones because broader bits will need to be run at slower speeds.
Nail Gun
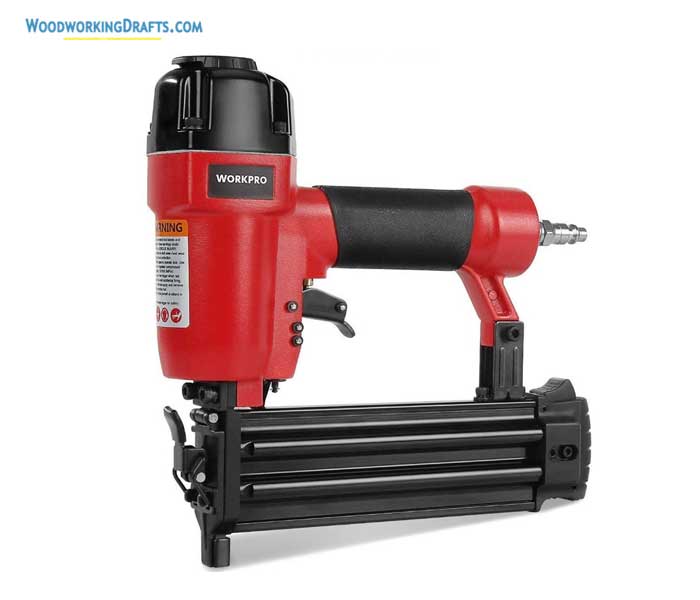
When you have to drive a large number of nails for a project in a short period of time, a nail gun becomes a very useful tool.
They can be driven by compressed air or a battery. Handle them with care as they may drive nails straight through the workpiece if you don’t keep the right setting.
Circular Saw
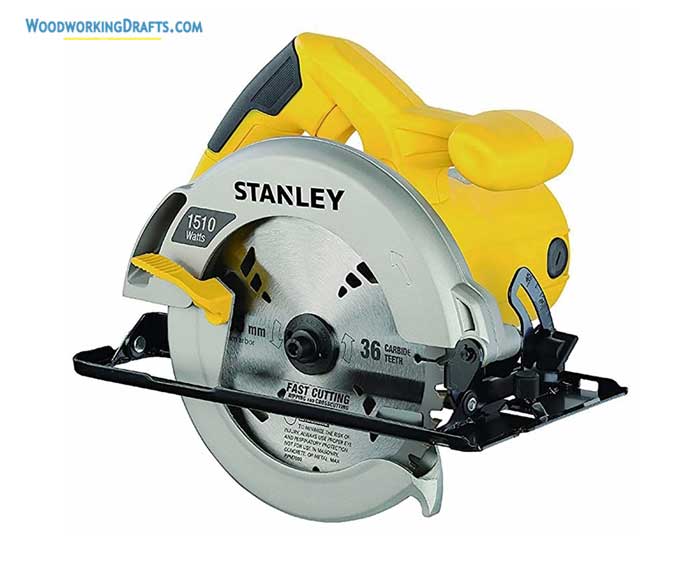
A circular saw is probably one of the most useful woodworking power tools. It is usually the first power tool many woodworkers buy when they are setting up shop.
Many different kinds of saw blades are available for different requirements.
Blades with small, closely packed teeth will make smoother cuts but will cut slowly.
Blades with large teeth and wide gullets between them will cut faster but will make bigger kerfs in the timber.
You should get a 40-tooth saw blade for uneven cuts and an 80-toothed blade for cutting plywood and laminated materials accurately.
Jigsaw
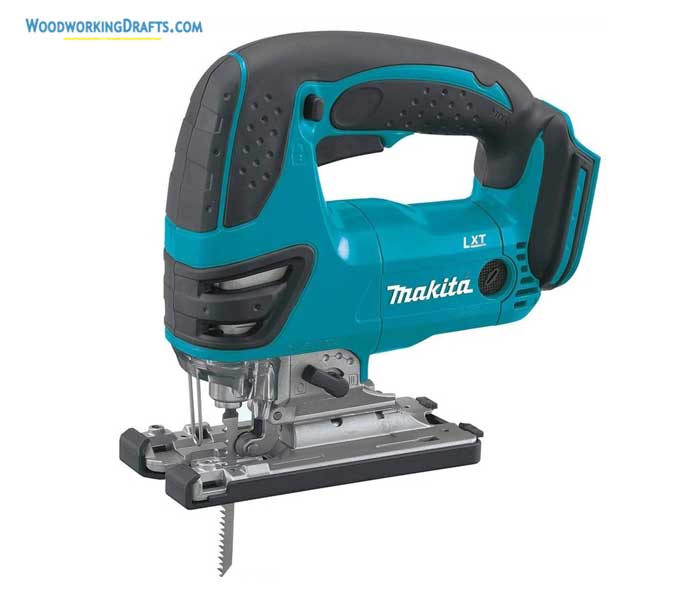
A jigsaw is a power tool used to cut thin boards and narrow pieces of timber.
Its thin blade makes it possible to make both straight and curved cuts as the blade keeps moving and moves up and down.
The back and forth motion of the jigsaw blade removes debris and chips on the downstroke and cuts the stock on the upstroke.
Woodworking Sanding Tools
Palm Sander
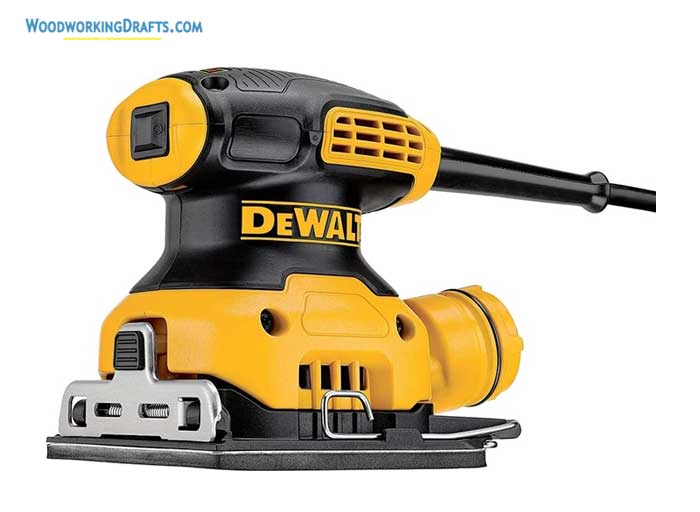
A good palm sander is an essential part of any woodworker’s tool collection.
A palm sander is a hand-held device that fits in your palm and helps you sand the finer details of your project. It usually uses a 1/4 sheet of sanding paper.
Palm sanders are particularly useful if you don’t want to paint a workpiece and just want to leave behind a silky smooth finish.
Random Orbital Sander
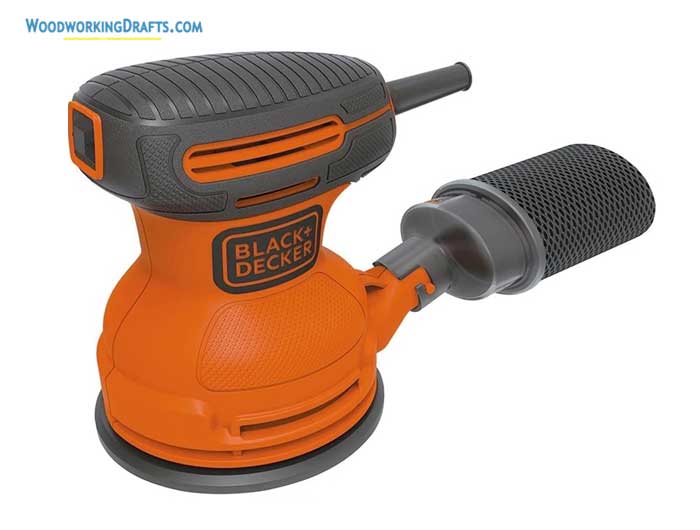
A random orbital sander is a powered sanding tool that is usually slightly larger than the palm sander.
It uses a fast-spinning sanding disc that rotates in a circle and also moves in an oval around the Z-axis. This combination of movements decreases the chance of leaving sanding patterns or whirls in the material being finished.
Apart from sanding, they can also be used to strip paint and rust. Random orbital sanders are used to prepare a woodworking workpiece for painting or varnishing.
Belt Sander
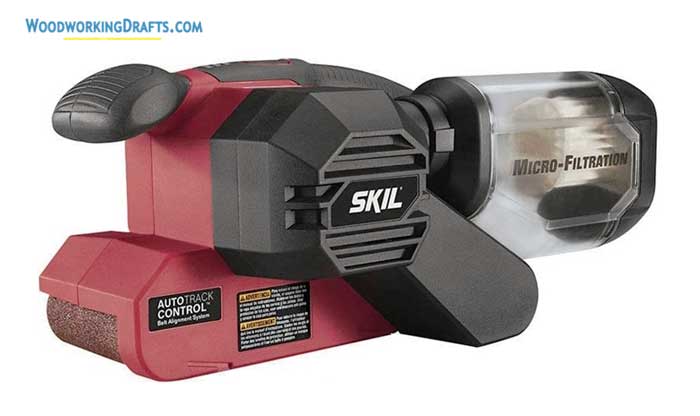
A belt sander contains two rollers or drums that are covered with a loop or belt of sandpaper.
A belt sander is excellent for removing large quantities of wood quickly. This makes them quite suitable for smoothing rough boards.
They are also used to smooth bigger wooden surfaces like countertops, porches, decks, and floors.
Spindle Sander
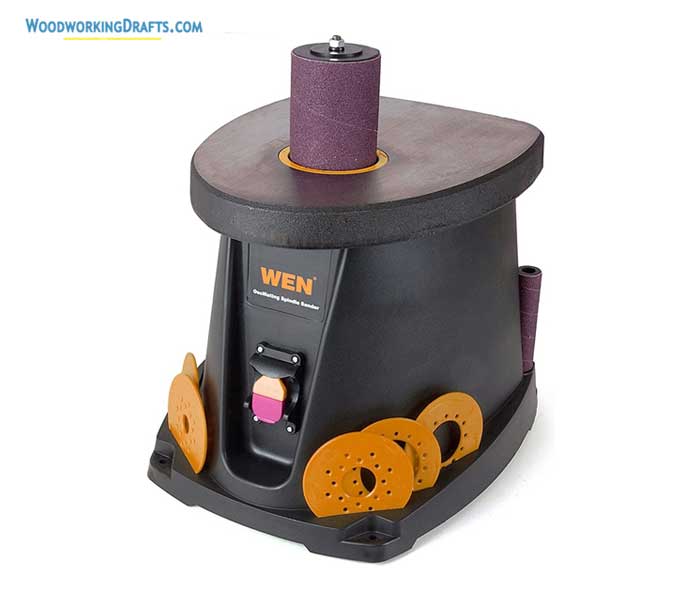
The best way to sand a curved edge or any uniquely shaped woodwork is with a spindle sander. This is a very useful tool for smoothing complex concave surfaces.
A spindle sander uses replaceable bobbins or spindles for performing the sanding operation. They are available in a wide range of sizes based on different uses.
You must keep moving the workpiece along the sander to prevent the formation of grooves from oversanding.
Woodworking Shop Power Tools
Table Saw
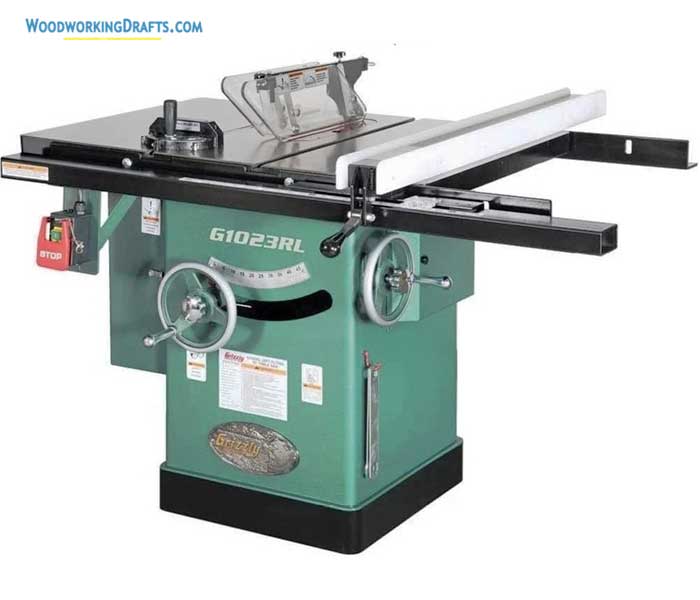
The table saw is the most used stationary power tool in almost all workshops. It consists of a flat table with a rotary saw blade protruding outside.
It is mainly used for cutting timber boards and solid lumber. You will frequently use it to square, groove, mold, and rip various wooden workpieces, so make sure to get a quality table saw.
It also usually comes with a side fence for guiding the piece being cut. The rotating saw blade can be raised, lowered, and tilted.
Some modern table saws have foldable steel or aluminum bodies.
Band Saw
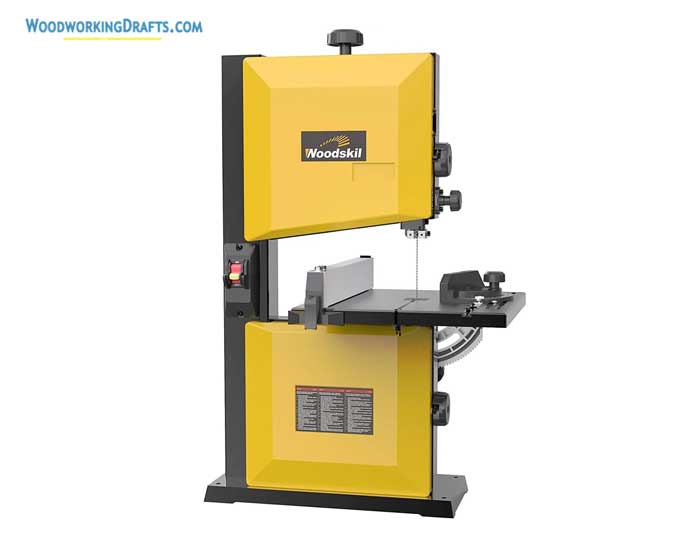
A band saw is a simple and versatile cutting tool that consists of a bendable steel blade run around two or three wheels in a loop. The blade runs through a base table that holds the workpiece in place.
Band saws are mainly used for cutting curves and making deep cuts which are usually not possible with a table saw. Some band saws have a riser attached to them to make cutting heavy boards easier.
Radial Arm Saw
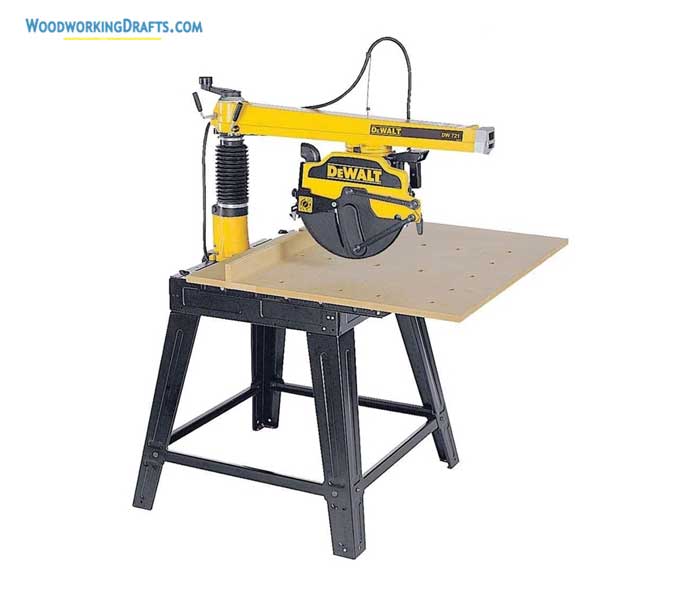
A radial arm saw has a circular saw connected to a movable arm.
It is a very versatile woodworking power tool used mainly for crosscutting. This tool can be of great help when cutting moldings, rabbets, miters, and bevels.
The head of the tool can be aligned to make partial or angled cuts. The arm can be rotated to cut wood at any desired angle.
Saber Reciprocating Saw
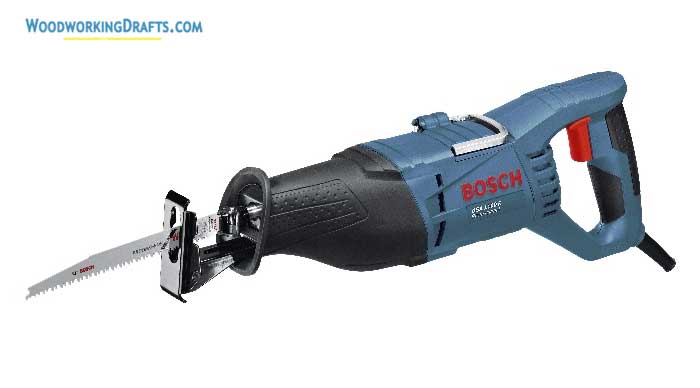
Every woodworker must own a saber saw. Also known as a reciprocating saw, it is an indispensable tool that will help you cut curves and patterns into timber boards.
A saber saw has a blade that moves up and down and can be adjusted to cut, miter, and rip designs into workpieces.
This tool will be very useful when cutting different pieces of a project to their overall length and width with a high degree of accuracy.
Compound Miter Saw
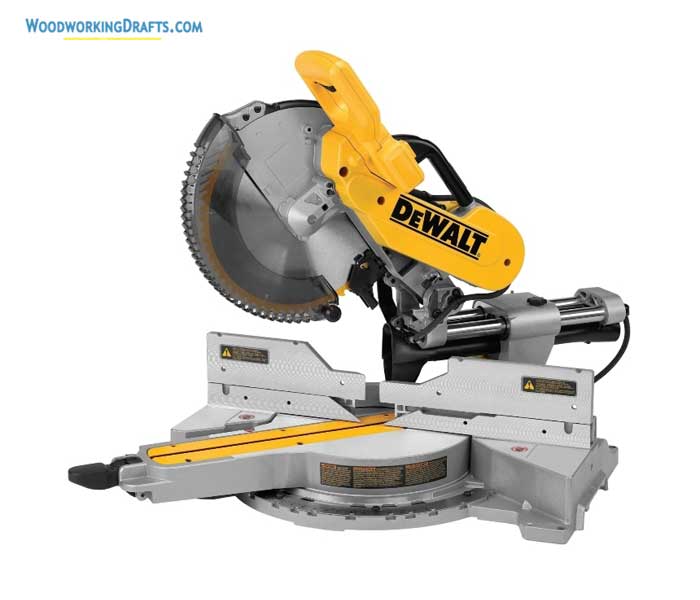
A compound miter saw is a very important woodworking tool for you if you make a large number of bevels and miters frequently. The tool is basically a circular saw mounted on a tiltable arm attached to a miter gauge.
This saw can trim in either direction at a 60-degree angle and can bevel up to an angle of 45 degrees. Saw blades are available in various sizes. For most woodworking needs, a 10-inch saw blade will be ideal.
A compound miter saw is a vital tool for building any project that requires cutting angles into two timber pieces.
Surface Planer
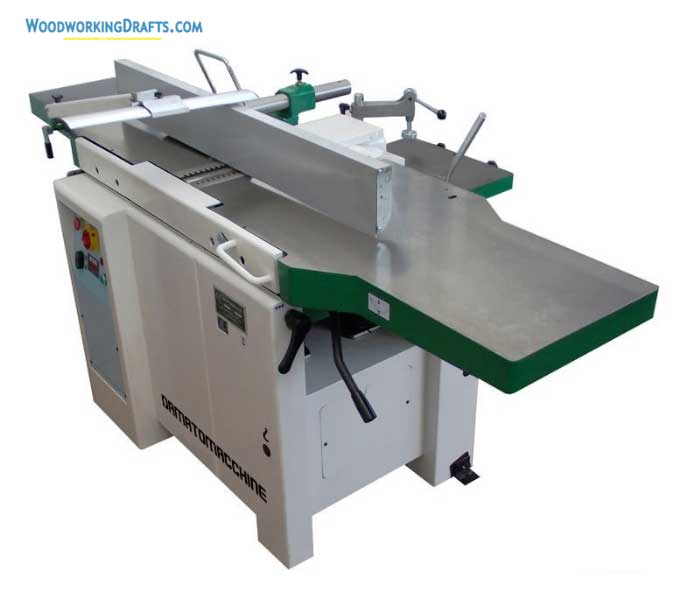
A surface planer helps you craft your stock into the right thickness quickly. It consists of a table on which the stock is fed to a group of rotating blades that cut the wood.
The depth of the cut can be adjusted with a crank. You can plane your boards down by as much as 6 inches in increments on this planer.
While this is an expensive and advanced tool, it can be a good investment if you are going into woodworking full-time.
Having a surface planer will allow you to purchase large quantities of wood at low prices and then mill the timber down to the required measurements quickly.
Benchtop Thickness Planer

A benchtop thickness planer is a smaller version of the larger surface planer that can fit onto a workbench.
This tool helps you get a uniform thickness on different workpieces and also makes the faces of any board perfectly parallel.
A benchtop planer, however, will only cut your rough stock to the required thickness. You may need another power planer or sander to smooth the timber surface and get a high-quality finish.
Mortisers
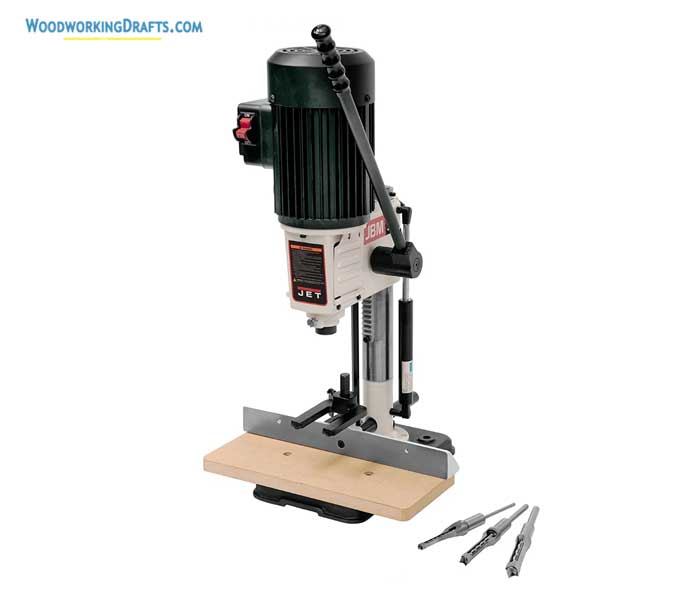
As the name suggests, a mortiser is used to cut mortises into stock. While you can use a router or drill press to cut mortises or even cut them by hand, a mortiser is designed to make the job really easy.
It creates perfectly square-cornered, clean-cut mortises. A mortiser can remove debris from the workpiece a lot quicker than you can by hand.
Drill Press
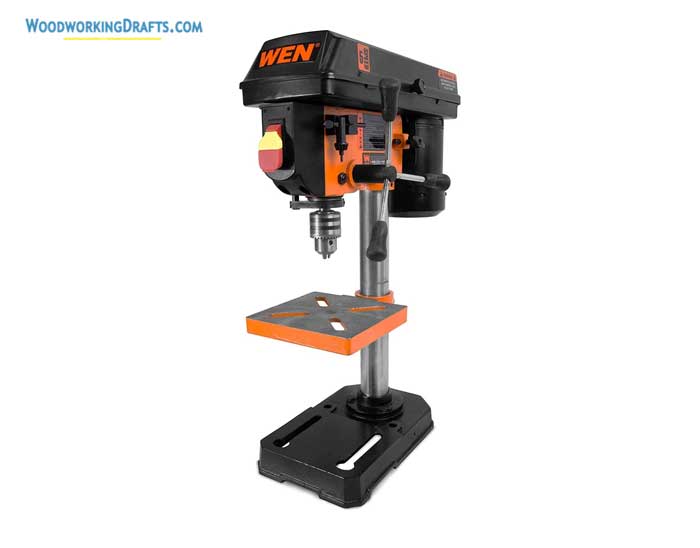
A drill press is a large and heavy machine that can be used to drill large diameter and deep holes accurately at any desired angle.
The tool consists of a movable drilling column and drill bits of varying sizes. While most drill presses drill vertically, some have adjustable heads that can be rotated for drilling at an angle.
Pillar drills are available in smaller bench-mounted models, which still need to bolted down because they are top-heavy and unstable.
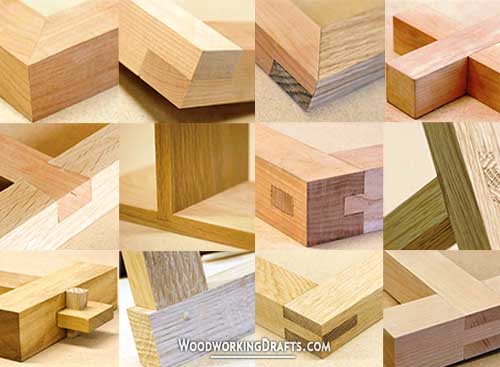
Woodworking Joinery Tools
Here are the tools used most commonly when crafting woodworking joints while building a DIY project.
Dowel Jig
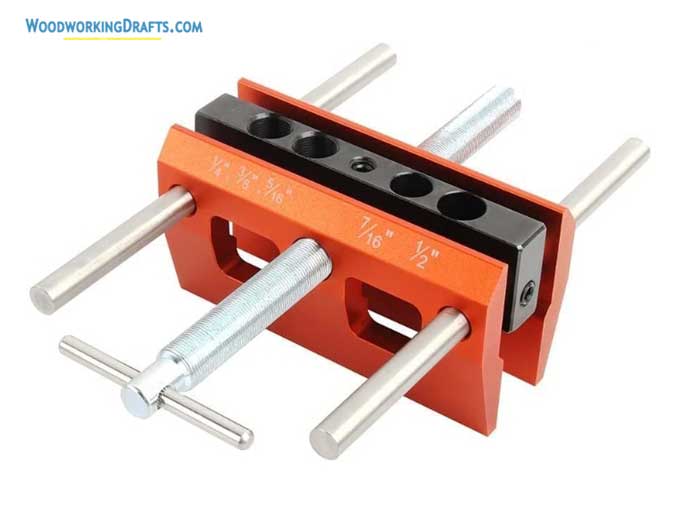
A dowel joint can help you easily and strongly join two boards by butting them.
A doweling jig is a tool used to guide a drill to make perfectly perpendicular holes in the face, end, or edge of a board. It removes the challenge of correctly aligning the holes for the dowels.
The fences of the jig can be adjusted to fit any stock width so that each hole is crafted precisely in each workpiece.
Kreg Jig
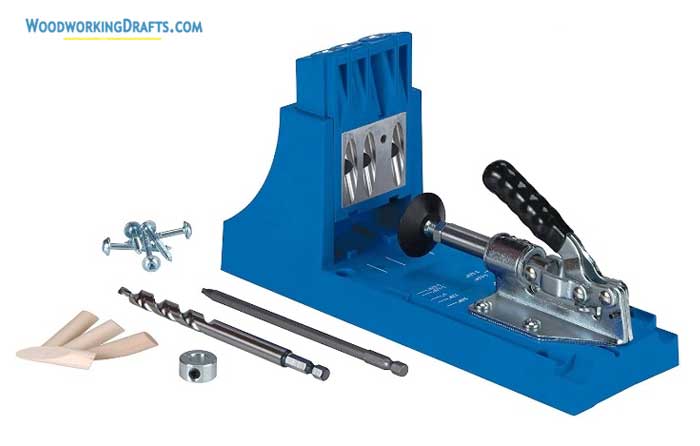
A Kreg jig allows you to drill holes used for pocket hole joinery. The pocket hole guides a screw from one piece of wood to another at an angle and creates a strong joint between them.
The Kreg jig is very simple to use. You just need to measure the timber, adjust the jig to the appropriate width, and utilize the guided slots to drill pocket holes in the precise location.
Biscuit Joiner
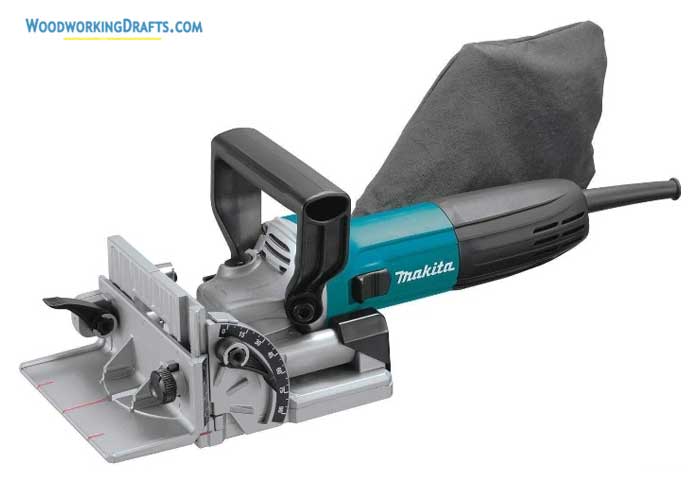
A biscuit joiner is used to cut circular slots into two pieces of timber. These two pieces are then joined together by inserting an oval wooden biscuit into the slots and gluing them together.
The two pieces are clamped together, and the glue is allowed to dry, which results in a strong joint.
The depth stop of the jointer can be adjusted to create slots of required depths based on the thickness and angle of the wooden pieces being joined.
Domino Joiner
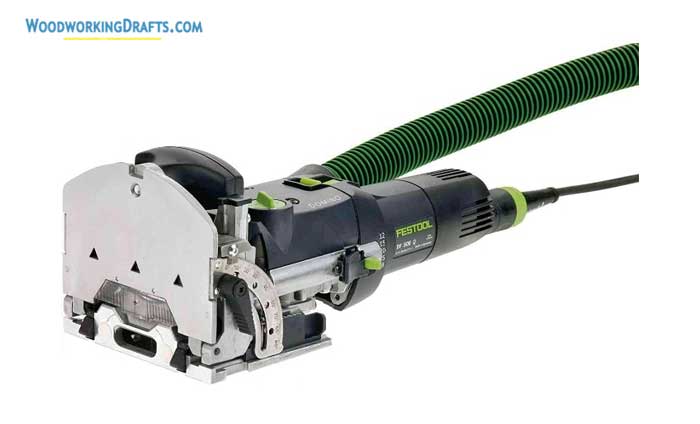
A domino joiner is used to create loose mortise and tenon joints.
The jointer cuts a mortise into stock. It has a spinning bit similar to a drill that moves up, down, and sideways at the same time. This allows you to create a full mortise in a single plunge. The jointer cuts mortises of standard sizes.
Due to this tool’s precision and repeatability, it can be used to quickly create a large number of joints. This can help reduce your project’s build time considerably.
Woodworking Safety Tools
Safety Goggles

Safety goggles are vital for protecting your eyes from flying sawdust and debris created while cutting timber with any power tool.
Even if you wear glasses, you should still wear safety goggles. Just pick one that offers plenty of ventilation to prevent fogging.
Ear Defenders
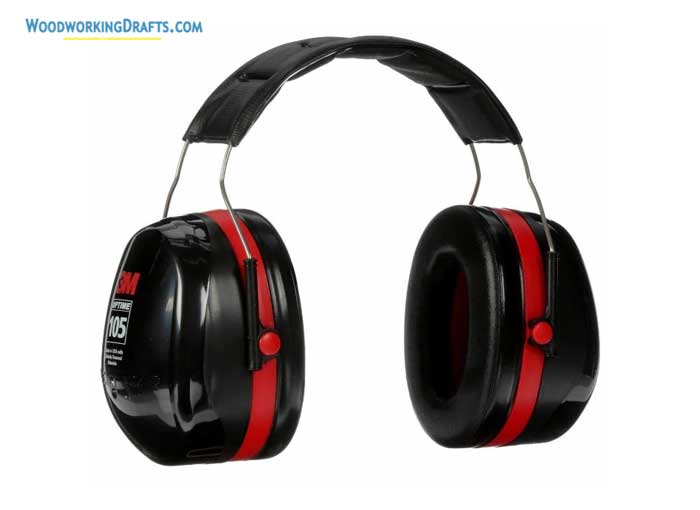
Many woodworking power tools can be quite loud and cause long-term hearing damage if you are exposed to their noise frequently.
The general rule of the thumb is that if you can’t understand what someone is speaking from 3 feet away when a machine is turned on, then you need to wear ear protection.
Dust Mask

The dust released while cutting wood and the fumes released by glues, varnishes, and other staining agents can all irritate your lungs when inhaled.
Some species of wood produce dust that can cause cancer. It is vital to cover your nose and mouth with at least a simple dust mask while you are working with these materials.
Protective Gloves
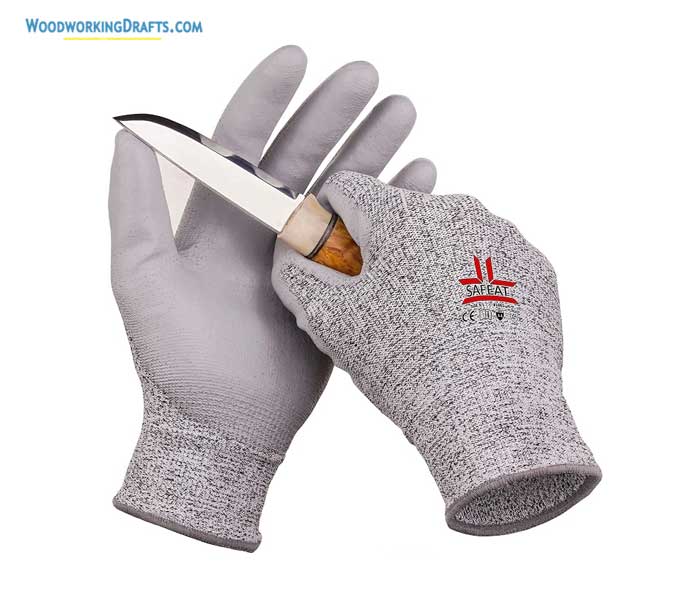
Protective gloves will save your hands and prevent cuts when handling sharp power tools and prevent splinters while working with large workpieces.
They are especially useful if you are new to woodworking. Because as you are learning, you are more likely to make mistakes that can lead to injury.
Steel Toe Capped Safety Boots

If a large piece of timber or workpiece slips from your hand and falls on your toes, it can lead to serious injury. Heavy tools may also accidentally fall on your feet and cause injury.
Get some steel-toed safety boots with slip-resistant soles to keep your feet safe in your workshop.
Basic First-Aid Kit
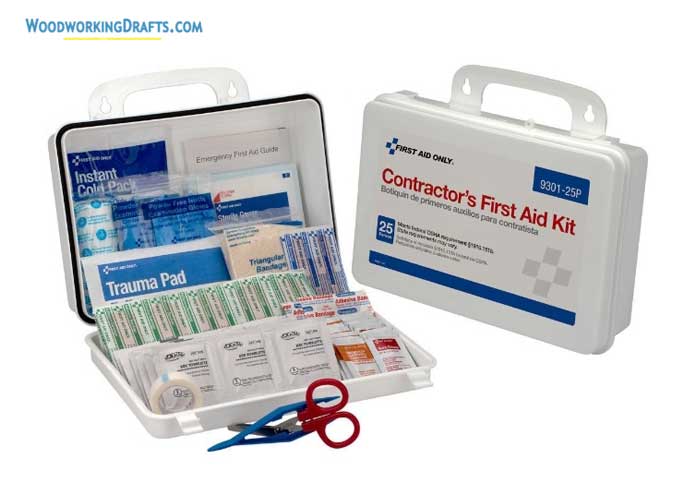
Every woodshop must have a well-stocked first-aid kit. Keep it in a place where it is easily visible and reachable to someone who is new to your shop.
A basic first-aid kit must have the below items.
- Antiseptic ointment
- Antibiotic ointment
- Scissors
- Bandages
- Butterfly bandages
- Tweezers
- Safety pins
- Medical adhesive tape
- Alcohol prep pads
- Gauze pads
- Iodine prep pads
- Burn medication
- Pain relievers
- Eye drops
Woodturning Tools
Wood-Turning Lathes
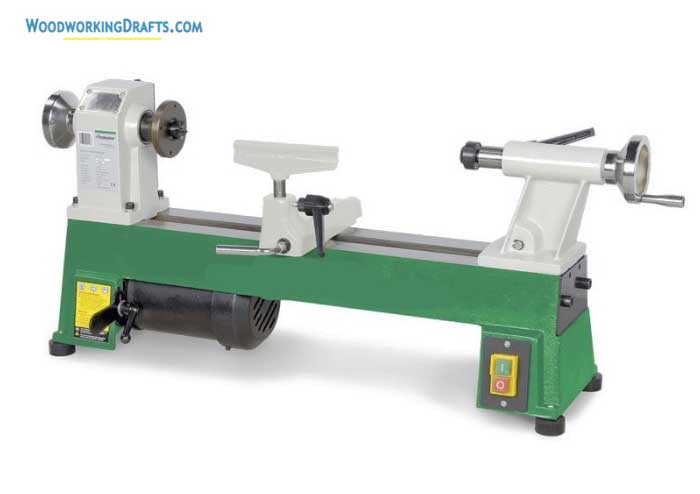
A woodturning lathe is used to shape-round or cylindrical objects like knobs or table legs. The lathe rotates the workpiece around an axis at a steady speed.
The piece is shaped symmetrically by pressing a hand-held cutting tool on it.
Every woodworker may not take up woodturning, but if you want to build fine pieces of custom furniture with intricate designs, then a lathe will be an important tool for you.
The Most Important Tool!
Wooden Workbench
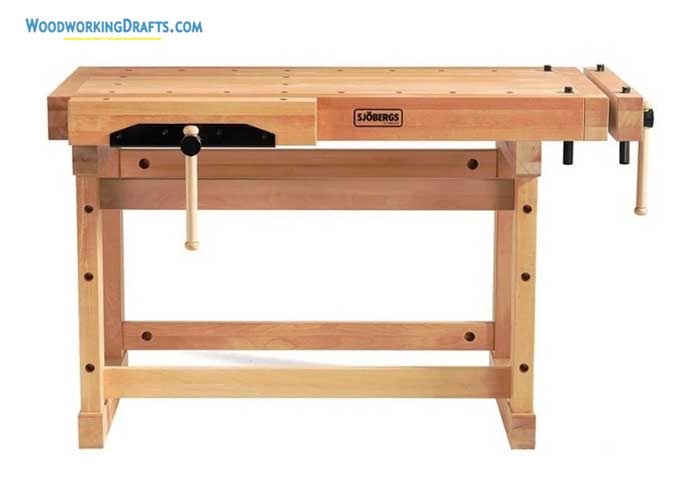
A wooden workbench will always be the center of any woodworker’s workshop. It is possibly the greatest “tool” in their collection.
You can build your own workbench from blueprints or buy a readymade one. If you are just starting out in woodworking, it may be better to buy one, as building a workbench may turn out to be a complex project.
The bench will need to be tailored to your particular needs. Apart from being sturdy, its height must be suitable so that you can work on it in a comfortable position without straining your back too much.
The front and end vises on the workbench are very essential features that help hold down a workpiece in position. Cheaper workbenches usually only have the front vise.
Bench Vises
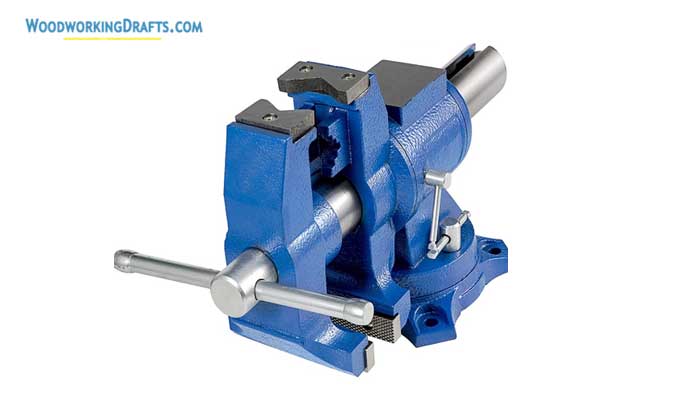
If you are on a tight budget and get yourself a low-cost workbench, then it may only come with one vise or even none.
Buying additional bench vises will help you make the workbench more usable.
Get yourself a large bench vise because it is more versatile than smaller versions. It can hold the workpiece in many different positions. A larger vise will also be easier to tighten.
Being familiar with all these must-have tools for woodworking will help you pick and choose the right equipment for your shop.
As your woodworking skills improve and you gain more confidence, you can keep adding more sophisticated tools to your collection.