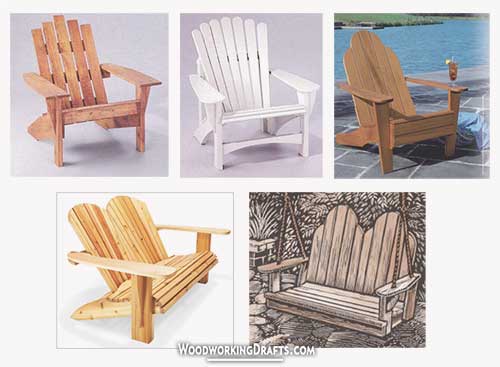
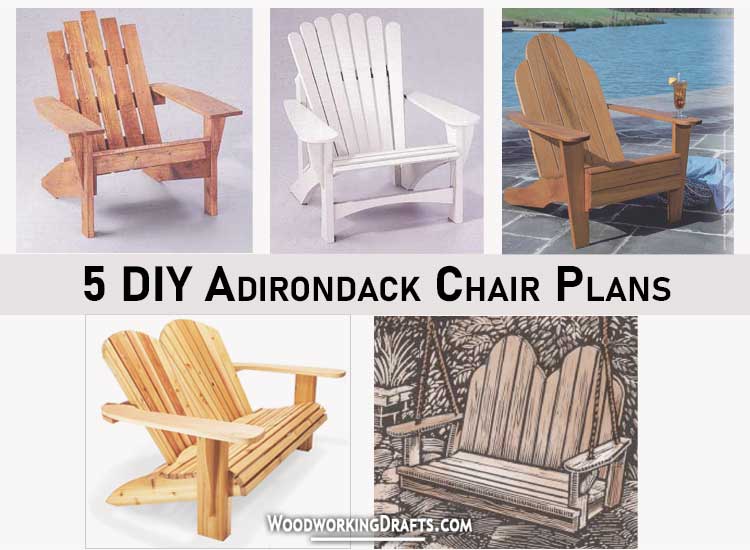
Building Blueprints For Single And Double Adirondack Chairs In Classic And Modern Designs
You can build a lovely outdoor seat with these DIY Adirondack chair woodworking plans and some quality lumber.
These blueprints feature simple designs and affordable materials so that you can quickly build the project in one day.
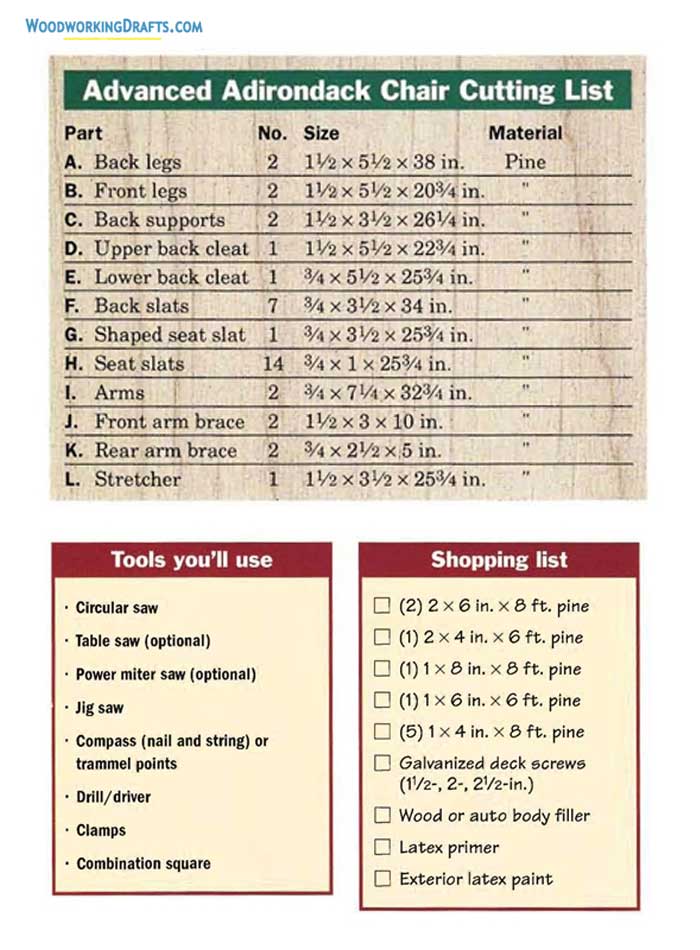
Simple Adirondack Chair Plans With Materials List
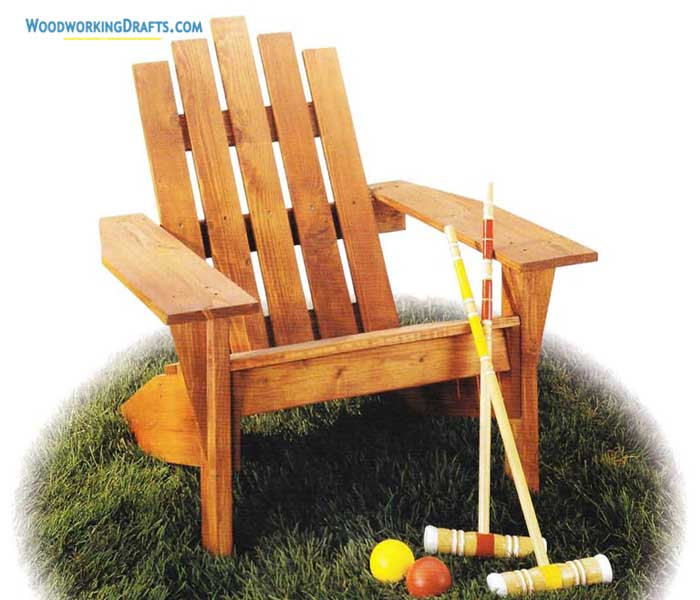
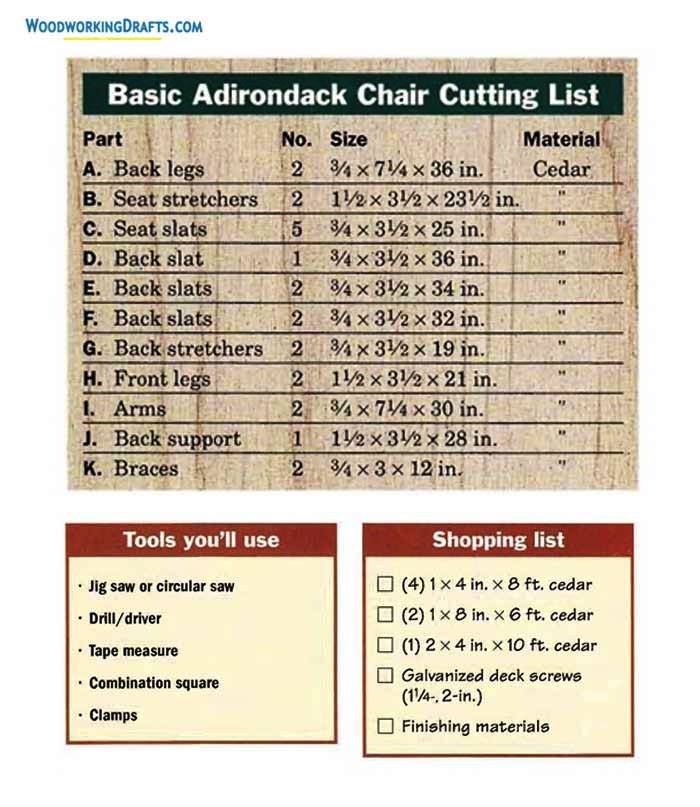
These simple Adirondack chair plans will help you put together a basic outdoor lounger in no time. Let us look at the steps involved in construction.
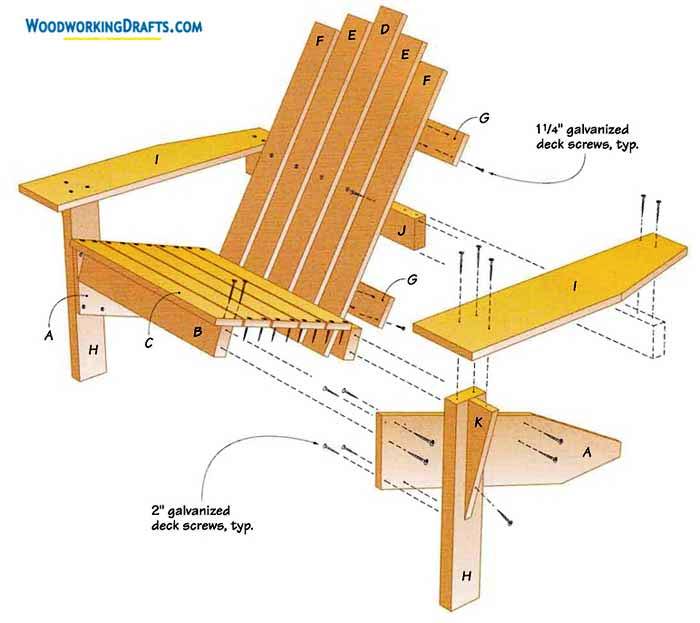
Build The Seat
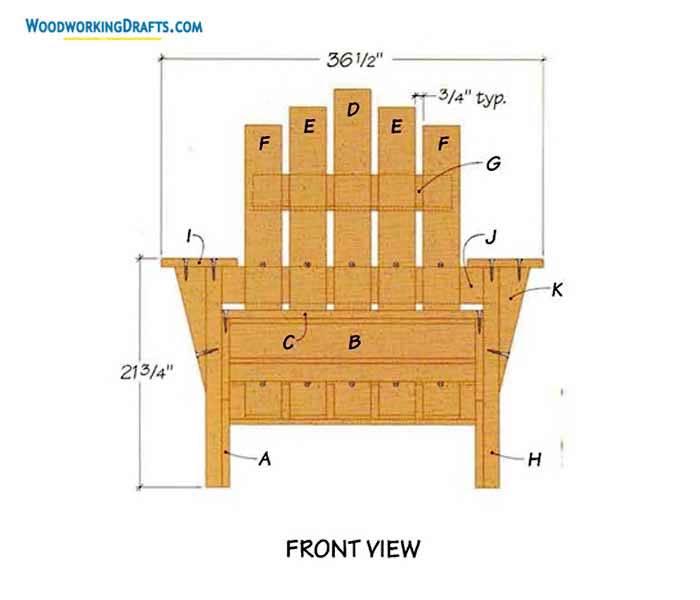
Use 1×8 timber to create the back legs, as shown in the blueprints. A circular saw will helo cut the leg angles.
Next, cut the seat stretches to accurate dimensions and secure the rear legs to the stretchers.
Align the edge of the back stretcher 19 inches from the front end of the legs.
Scribe the position and drill pilot holes through the stretchers and legs. Fasten the components with deck screws.
Craft The Arms
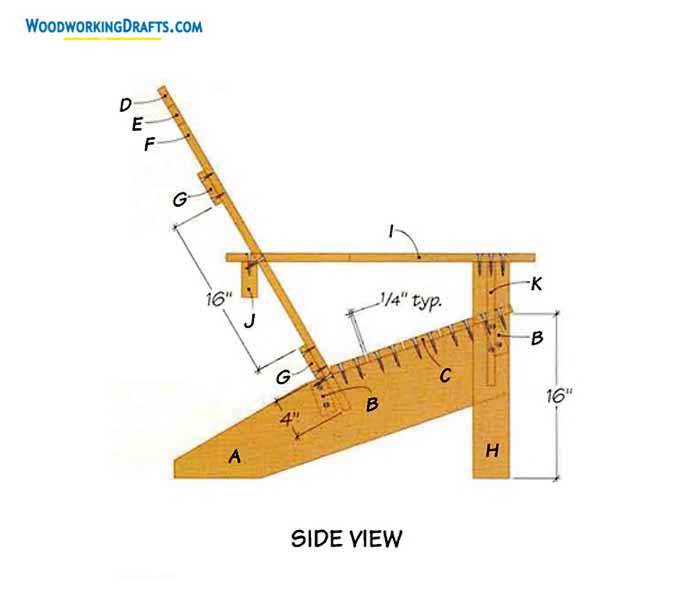
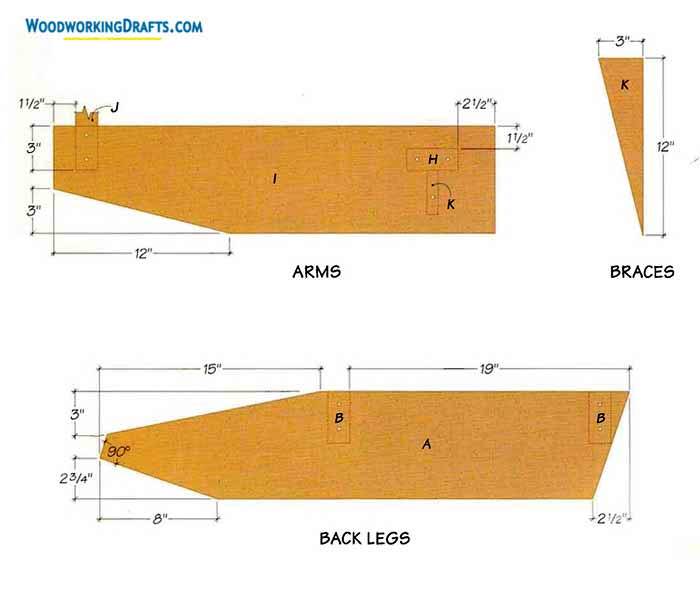
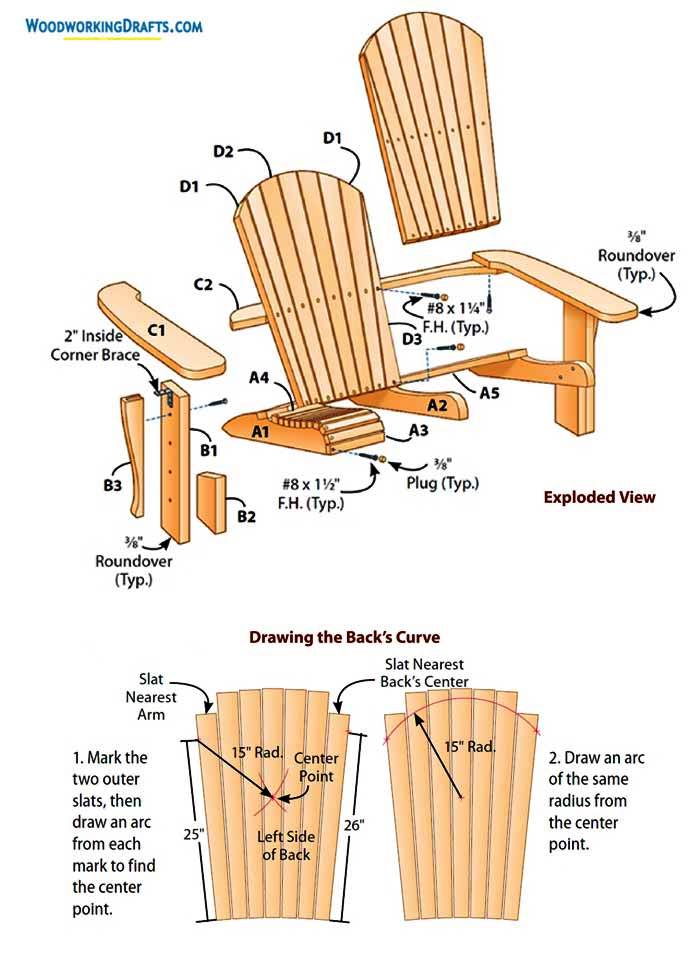
Cut the arms, legs, braces, and back supports to precise lengths.
Scribe the angle on the rear corner of each arm and cut the angles with a circular saw. The trimmed triangular pieces remaining after the cut will later be used as the arm braces.
Put the arms face down and scribe the locations for installing the back support, braces, and legs.
Now turn the arms face upwards and drill pilot holes for attaching these components.
Use 2-inch deck screws to fasten the back support and legs. Secure the braces using countersunk screws.
Arm And Seat Assembly
Use clamps and temporary braces to secure the seat and arm assemblies together.
Cut out two 21-inch long pieces of scrap lumber for crafting the temporary braces.
Lift the arm assembly and fix the brace underneath to hold it level.
Align the seat assembly in between the front legs such that the front and back legs are flush with each other.
The upper corner of the rear legs must be 16 inches higher than the bottom corner of the front legs.
Use deck screws to secure the legs with the seat, and then take out the temporary braces.
Construct The Back
Craft the back stretchers and slats to proper dimensions.
Lay the back slats face down and align the stretchers such that the lower one is 4 inches from the lower ends of the slats.
A 16-inch gap must be present between the bottom and top stretchers.
Sink pilot holes through the stretchers into the slats and fasten them by driving deck screws.
Connect the chair back by aligning it with the stretcher at the lower back and rest it on the back seat stretcher.
Create pilot holes that pass through the rear seat stretcher into the back slats and back support. Fasten them by driving 2-inch deck screws
Fasten Seat Slats
Construct the 5 seat slats as per measurements shown in the blueprints and fasten them with deck screws to the back legs.
Use spaces to hold the slats evenly away from each other as you secure the slats.
First, remove the arm on one side and fasten the seat slats with screws, then replace the arm. Do the same with the other arm.
Sand all visible areas of the chair with a sander and cover the wood with a paint or stain.
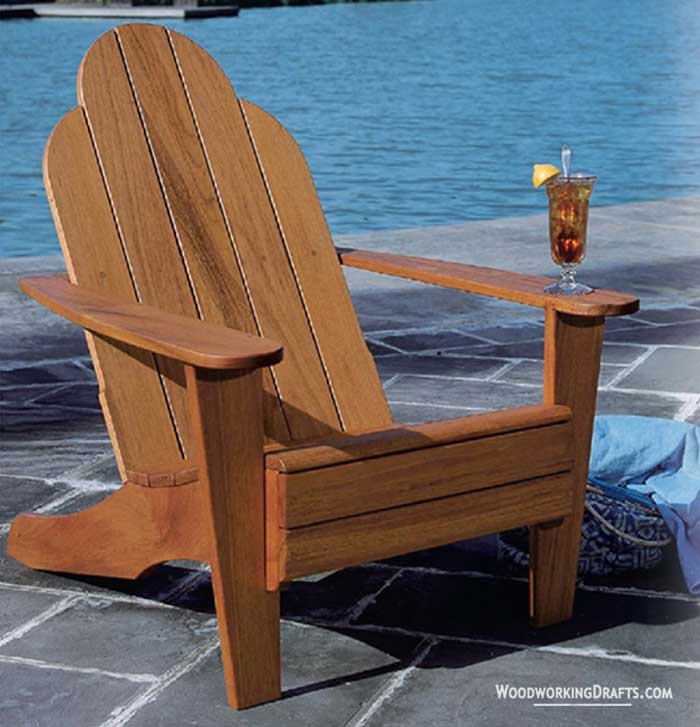
DIY Modern Adirondack Chair Blueprints With Templates And Cutting List
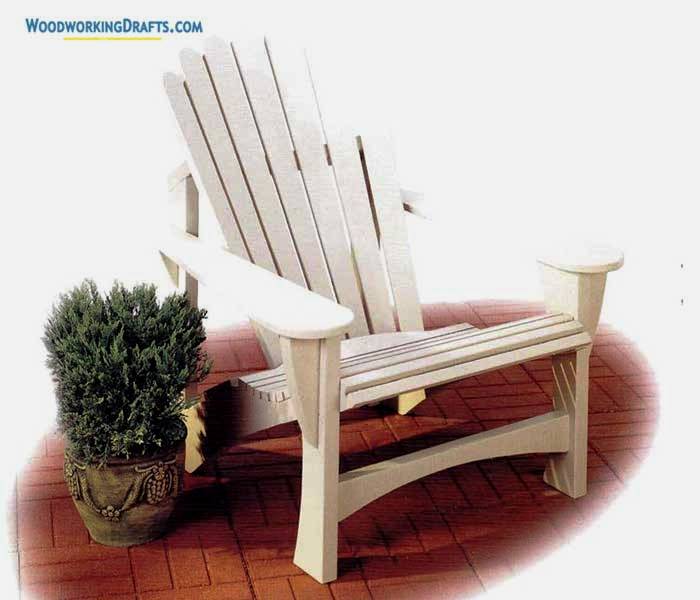
Our DIY modern Adirondack chair building plans are designed to bring out the curves and enhance comfort in your outdoor lounger. The wide arms in this modern layout allow enough space to rest a drink or snack.
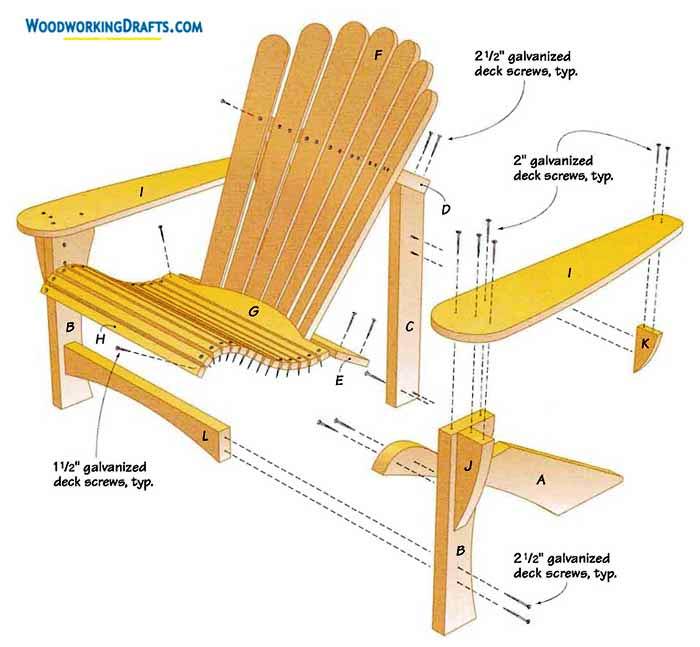
Construct Arms & Legs
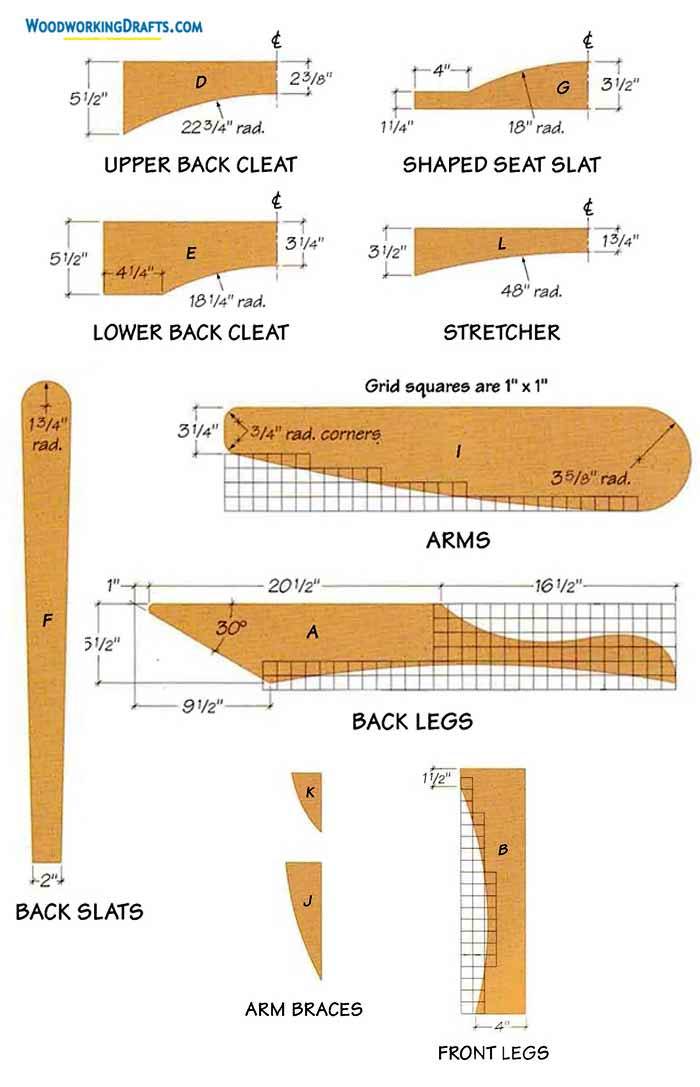
Cut timber pieces to appropriate dimensions for crafting the legs and arms as shown in the blueprints.
You can create templates from scrap lumber and smooth its edges. Reuse them over and over if you want to build more than one chair.
Place the template on the timber pieces you created earlier and scribe the shapes for the arms and legs. Cut out each component with a circular saw or jig saw.
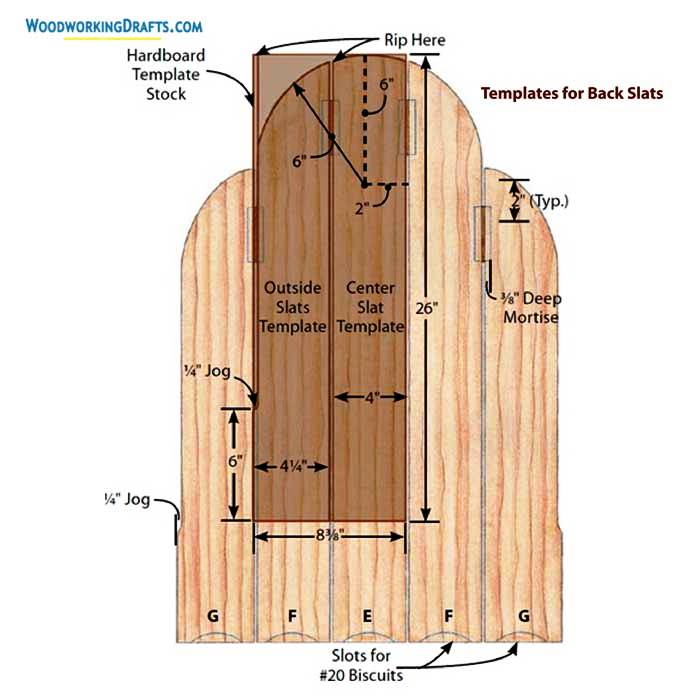
Build Back Slats
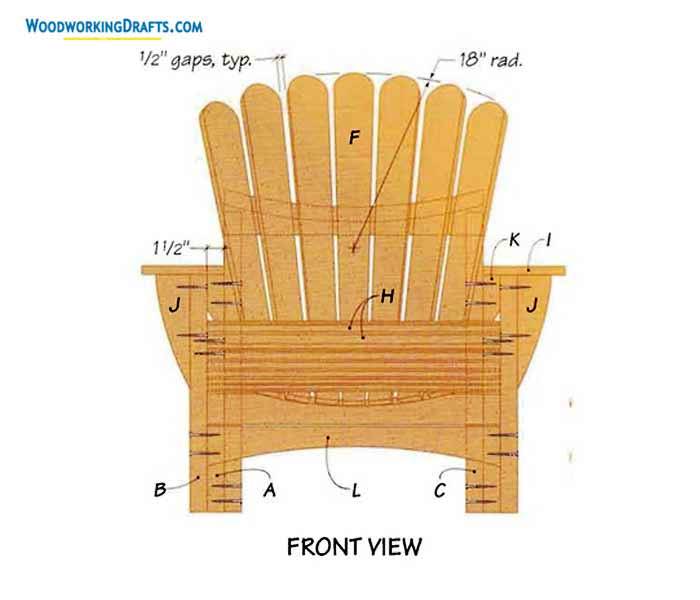
The back slats taper along their lengths. Create the template for the slats using hardboard or scrap lumber and scribe the profile on 1×4 timber boards. Cut out the slats using a jig saw.
Repeat the process until all seven back slats are crafted.
The slats are of equal length right now but will be trimmed to their final measurements during the chair assembly.
Position the end radius on the slats and scribe the tapered edges on them. Cut out the tapered edges on the slats one at a time using a table saw and a rip fence. Then cut the radiused ends with a jig saw.
Use a sander to smoothen the cuts.
Craft Other Profiles
Construct the rear and front arm braces to measurements shown in the blueprints. The curvature of the different parts should match each other.
Create the upper and lower back cleats, the stretcher, and the shaped seat slat.
To correctly cut the radiuses for each section, first cut the blanks and clamp them over your workbench.
Find the central line for the piece. Drive a nail into the workpiece center and tie a thread to it. Measure the radius distance on the thread and attach a pencil at that point, then trace out an arc using the pencil.
Cut out the arcs along the pencil markings.
Assemble Seat Slats & Back Supports
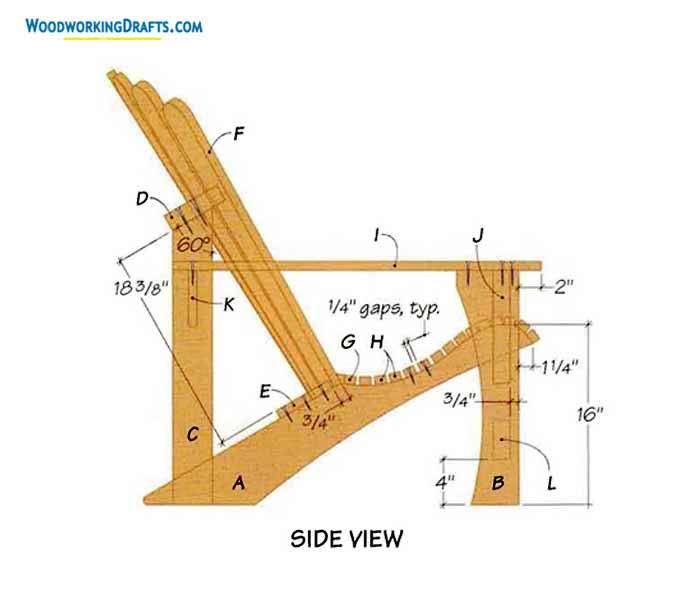
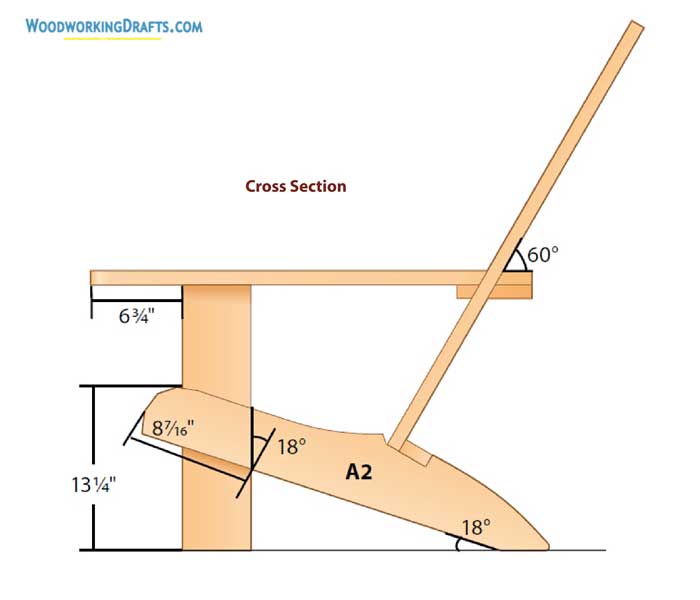
Craft the back supports to the measurements shown in the diagrams and trim their upper ends at a 60-degree angle.
Create 14 seat slats from timber boards using a circular saw.
As this chair will be left outdoors, it is best to coat all the component pieces with a latex primer at this stage.
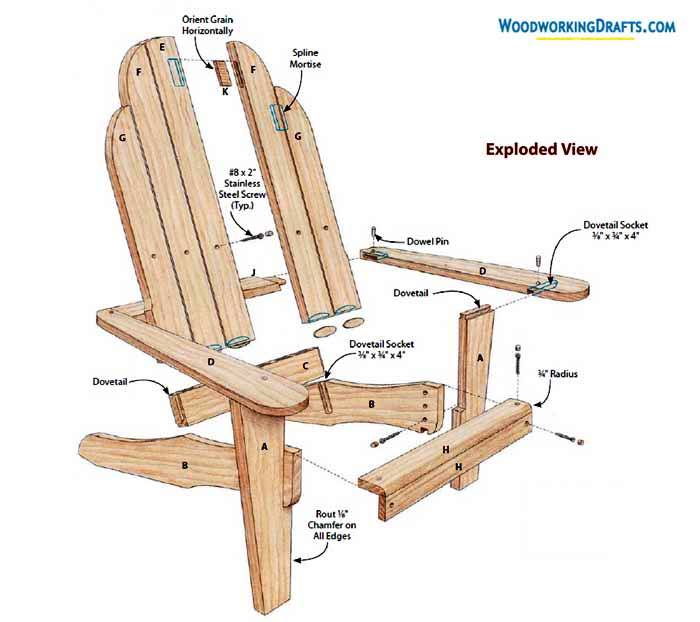
Build Arm & Back Assemblies
Fasten the braces for the front arm flush with the outer part of the front legs.
Now connect the outer faces of the back supports with the rear arm braces.
Secure the arms with the back supports and front legs by driving 2-inch deck screws into pre-drilled pilot holes.
Connect the outer faces of the back supports and the inner faces of the front legs with the back legs. Drill pilot holes and secure the components with deck screws.
Craft two spaces to temporarily fasten the lower and upper back cleats in position as you secure the back slats.
Erect the lower and upper back cleats onto their back edges and fasten spacers between the cleats temporarily with clamps.
Position the back slats into the curved part of the cleats and insert some spacers to position them at equal intervals.
Align the central back slat level with the lower face of the bottom back cleat.
Position the remaining slats on cleats such that their upper curved ends are precisely in an arc of an eighteen-inch radius using a string compass.
Trace a line on the back slats at the positions where they cross the bottom back cleat. Trim these bottom ends and realign the slots over the back cleats.
Drill pilot holes and secure the cleats with the slats using deck screws.
Final Chair Assembly
Fasten the back assembly in place between the two arm assemblies such that the lower back cleat is positioned 3/4 inch behind the point where the seat’s profile starts at the upper edge of the rear legs.
The upper back cleat must be positioned on the back supports.
Attach the stretcher between the front legs at a distance of 4 inches from the bottom of the legs. This should hold the frame in place as you install the back assembly.
Secure the back legs with the lower cleat and the back supports with the upper back cleats using deck screws.
Take out the arms, for now, to make it easy to fasten the screws. First, secure the shaped seat slat and then attach the other seat slats evenly spaced out along the curved profile of the back.
Now reconnect the arms.
Seal all screw holes with filler and sand all surfaces smooth.
Comfortable Adirondack Chair Building Plans And List Of Materials

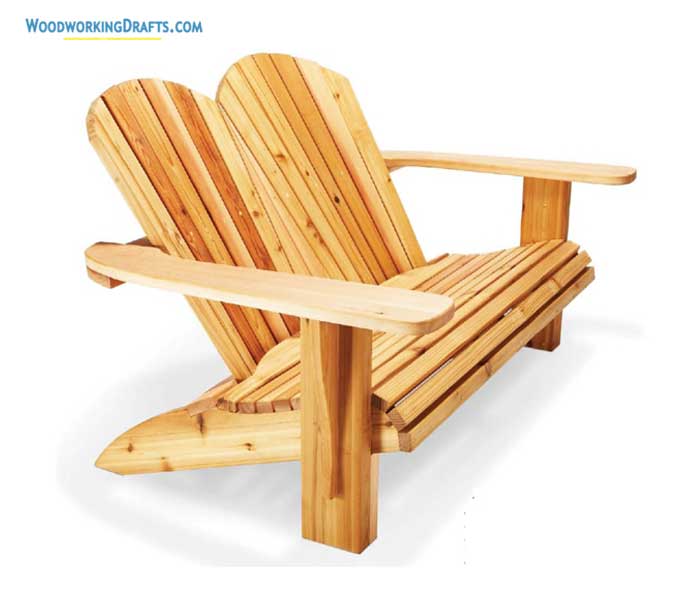
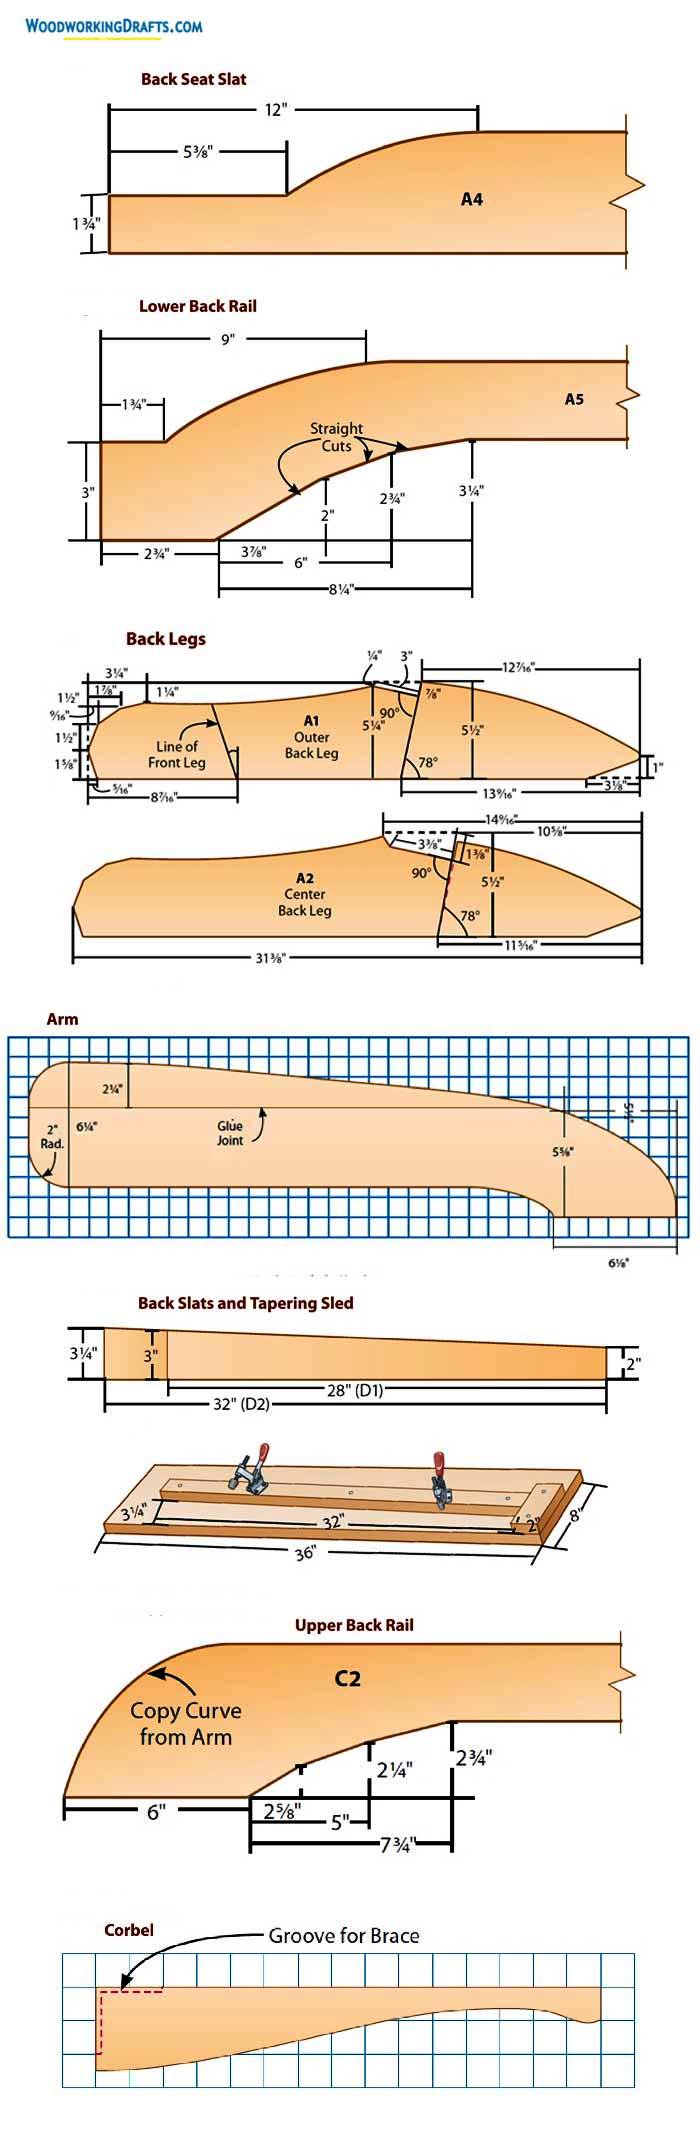
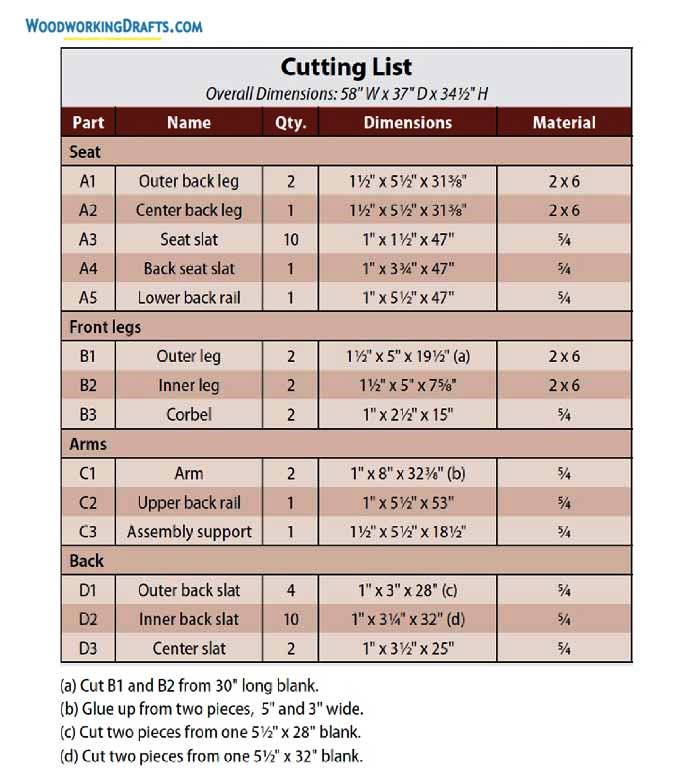
DIY Double Adirondack Chair Plans Featuring Cutting List

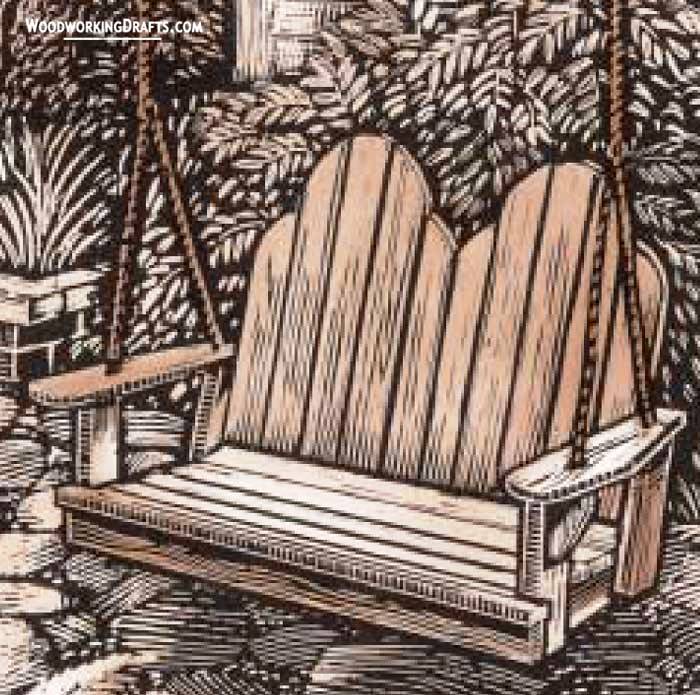
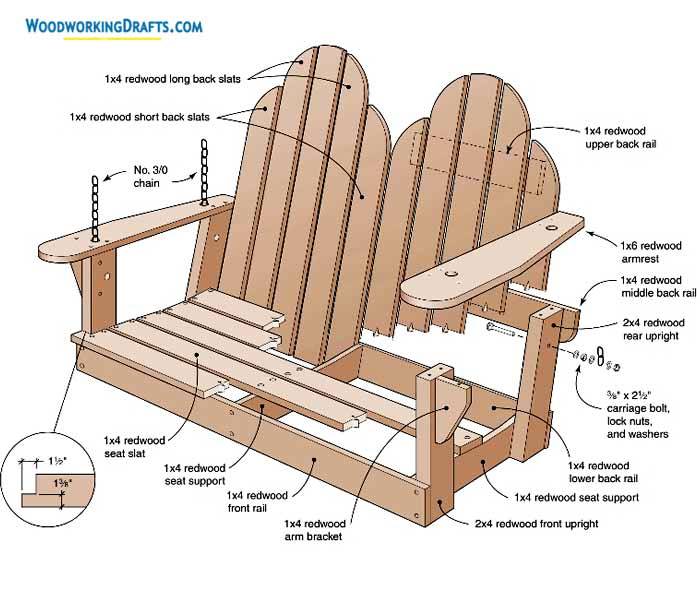
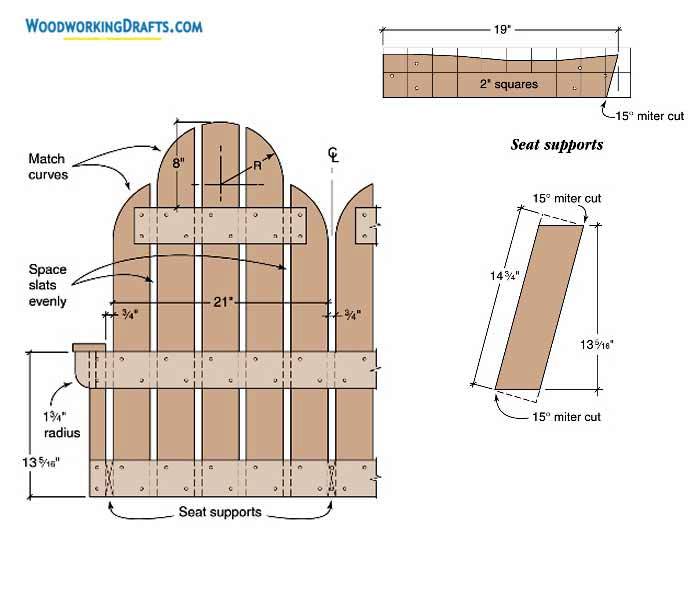
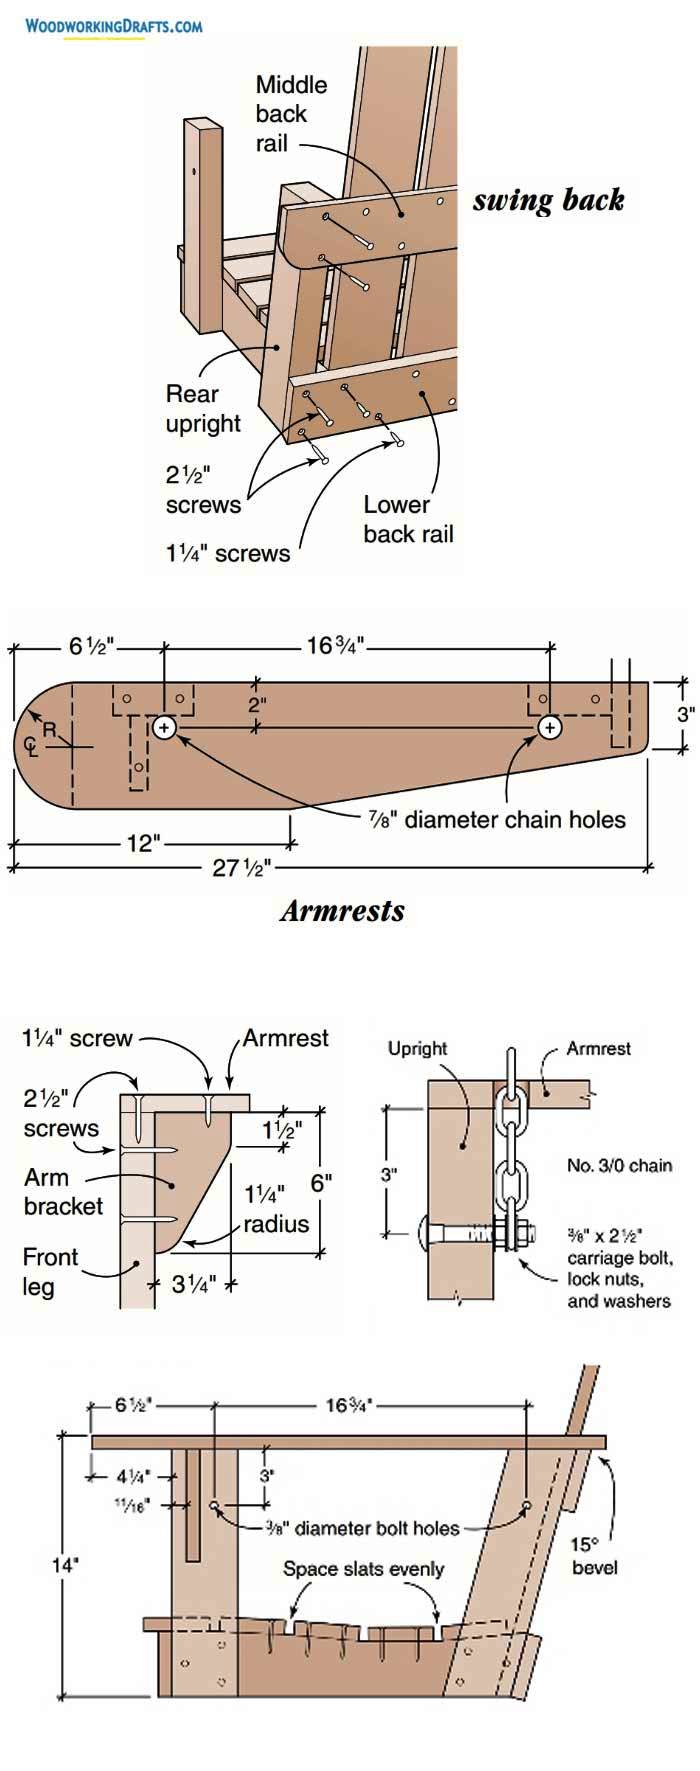
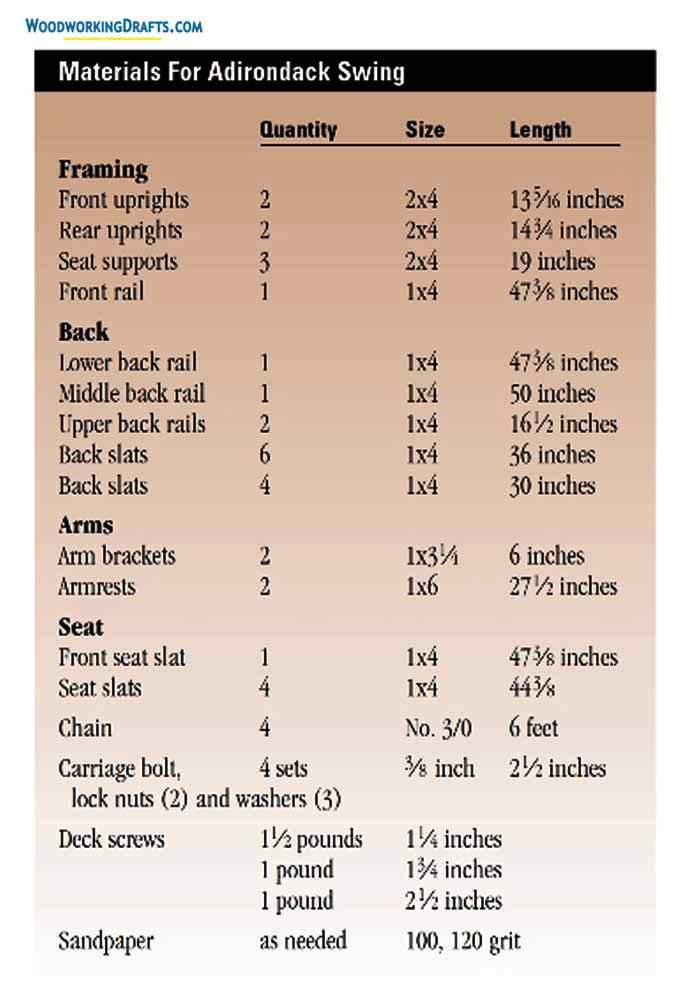
Swinging Adirondack Chair Blueprints
These simple DIY Adirondack chair building plans will help you assemble a sturdy and comfortable lounger that will last many years.